

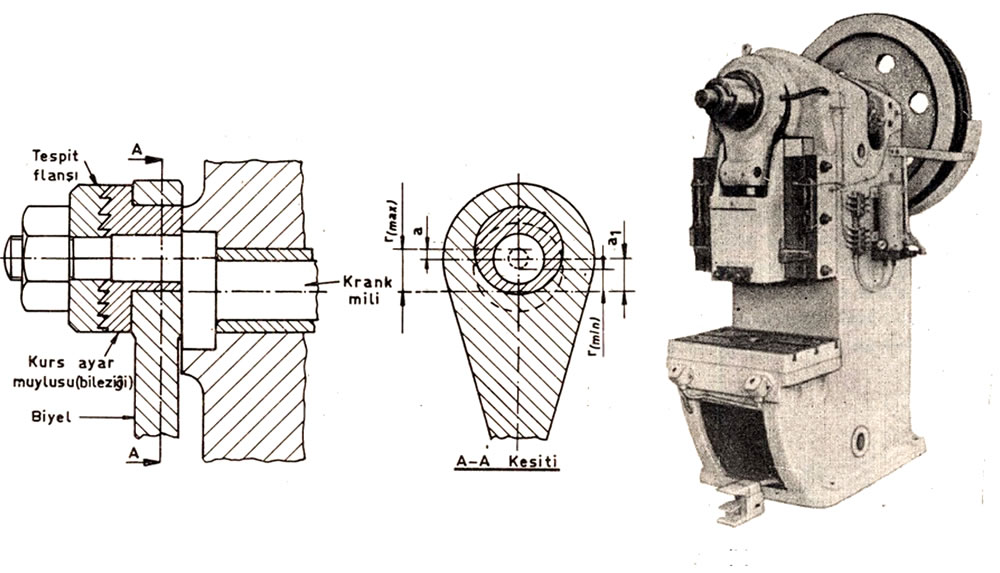
On today’s presses, the machine’s stroke capacity is set by the manufacturer using the graduations marked on the stroke adjustment collar that surrounds the crankshaft.

The safety bolt and key fitted to prevent the nut from loosening due to shock and vibration are removed, and the nut is loosened. It’s loosened by the distance the jaw clutch needs to rotate. Then, the stroke adjustment collar is turned via the shaft to achieve the desired stroke length.
Once the correct stroke setting has been made, the jaw clutch is clamped by tightening the nut, and the safety bolt is also tightened, completing the stroke adjustment.
The press ram is lowered to bottom dead center by hand using the flywheel. The die-clamping shoe on the ram is removed, and the die, with its die shank already attached, is placed into the ram’s socket. The shoe is fitted back in place, and its nuts are left without being fully tightened.

Loosening the lock nut, the press ram is lowered to bottom dead center using the ball-head adjustment screw. The die is clamped tight. The die-shank clamping shoe screws on the ram are then fully tightened.
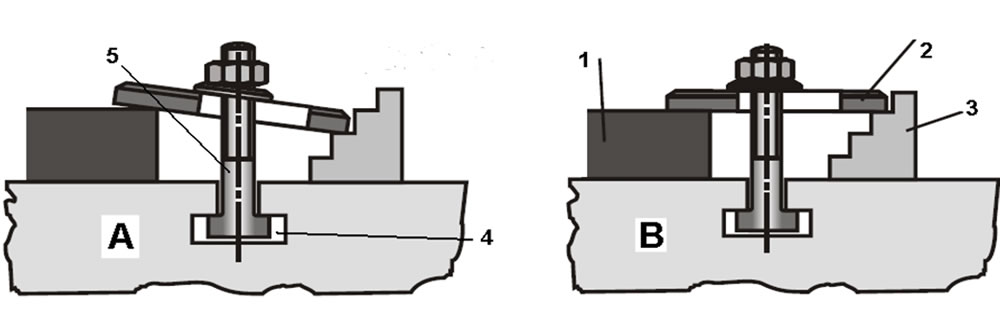
The die is attached either with die-clamping shoes squeezed between the press ram and the press’s lower table, or with fasteners through slots machined into the die’s lower plate to match the press’s T-slots. When clamping, connections should be made at the points on the T-slots closest to the die, at a minimum of 2 points, without putting undue strain on the part being pressed.

The simple, basic principle for clamping to the press’s lower table using T-slots: the stud you’re attaching should always be as close as possible to the DIE.

The working gap of the die attached to the press is set below. It’s raised via the ram’s screw and adjusted to the correct position. After checking the connections, a trial run is done by turning the flywheel by hand. Then a no-load press cycle is run, and if that goes well, work on the press begins.

To view and download this article as a PDF document, CLICK HERE
Die Zeroing Precision
The zeroing precision during die clamping on an eccentric press directly affects the dimensional accuracy of the part produced.
Clamping Components
Dies are fixed to the press table using T-nuts and clamping shoes.
Parallelism Check
Checking the parallelism between the upper and lower die is a critical clamping step that extends the die’s service life.
Related Questions
This bolt prevents the stroke adjustment collar from turning unintentionally during operation. It needs to be loosened before making the adjustment, otherwise the collar can’t be moved to the desired setting.
The gap between the die’s upper and lower halves can only be set correctly while the press is at its lowest position. Clamping in this position guarantees the die closes correctly during operation.
Related Posts
 Stops and Side Gauges in Blanking Dies
  Compound Dies
  Carbide Dies and Punches in Drawing Dies
  Drawing Speed and Drawing Force in Drawing Dies
  Cooling System in Plastic Injection Molds
  Standard Die Shanks and Their Dimensions
  Blank Holder Plates and Ejector Plates in Blanking Dies
  What Is Aluminum Extrusion, How Is It Done?