
Works by click and drag. You can also use the keyboard arrow keys.
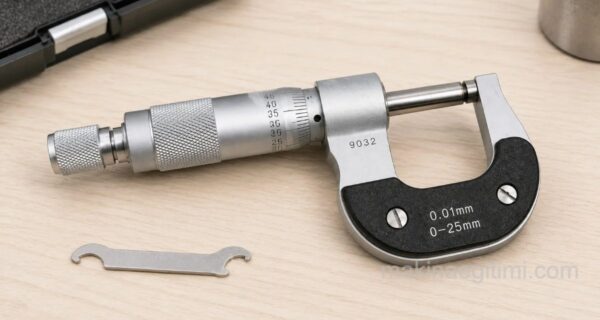
The simulator above reproduces a 0-25 mm outside micrometer, one of the most widely used precision instruments in any workshop. Drag the thimble to advance the spindle, take the reading from the sleeve and thimble yourself, then reveal the answer to check it. The arrow keys let you step through the measurement in fine increments.
Parts of a micrometer

- Frame: the C-shaped body that holds the two measuring faces in a fixed relationship.
- Anvil: the fixed measuring face built into the frame.
- Spindle: the moving face that advances onto the workpiece as the thimble turns.
- Sleeve (barrel): the fixed tube carrying the millimetre and half-millimetre graduations.
- Thimble: the rotating part, divided into 50 equal graduations around its circumference.
- Ratchet: the knob at the end of the thimble that slips once a set force is reached, keeping the measuring pressure constant.
- Lock: clamps the spindle so the reading holds while you take the instrument off the part.
How to read a micrometer
A micrometer reading is the sum of three parts: whole millimetres, a half millimetre if one is showing, and hundredths from the thimble.
- Read the last whole millimetre visible on the upper row of the sleeve, up to the edge of the thimble.
- Check the lower row of half-millimetre marks. If one has emerged from under the thimble, add 0.50 mm.
- Find the thimble graduation that lines up with the horizontal datum line on the sleeve and multiply it by 0.01 mm.
- Add all three together.
Example: the 12 mm mark is visible on the sleeve, the half-millimetre mark has also appeared, and the thimble reads 23 against the datum line. The measurement is 12 + 0.50 + (23 × 0.01) = 12.73 mm.
Why it reads to 0.01 mm
The spindle runs on a precision screw thread, and one full turn of the thimble advances it by 0.5 mm. Because the thimble is divided into 50 equal parts, a single graduation corresponds to 0.5 / 50 = 0.01 mm. That relationship between thread pitch and division count is the whole source of the instrument’s precision, and it is also why the measuring range is so short: a standard outside micrometer covers just 25 mm, which is why they are sold in sets of 0-25, 25-50 and 50-75 mm.
Micrometer or caliper?
They are not interchangeable; each has a job the other does badly.
- Resolution: a micrometer reads to 0.01 mm against 0.05 or 0.02 mm for a vernier caliper. Tight tolerances need the micrometer.
- Range: one micrometer only covers 25 mm. A single caliper handles 150 mm or more.
- Type of measurement: a caliper takes external, internal and depth measurements. A standard outside micrometer measures external dimensions only.
- Measuring force: the ratchet keeps the force constant on a micrometer, so two people get the same reading. On a caliper the force is entirely down to the user.
In practice the two work together: you take overall sizes and lengths with the caliper, then check the diameters that carry a tolerance with the micrometer.
Common measuring mistakes
- Missing the half-millimetre mark. This is by far the most common micrometer error and it puts the reading out by exactly 0.5 mm. Whenever the thimble reads close to 50, check the lower row of the sleeve carefully.
- Not using the ratchet. Tightening with the thimble itself gives an undersized reading and damages the thread over time. Turn the thimble until the spindle is close, then finish on the ratchet.
- Skipping the zero check. With the faces in contact, the thimble zero must align with the datum line on the sleeve. If it does not, the micrometer needs resetting with its spanner.
- Holding the frame for too long. Body heat expands the metal. For precise work, hold the instrument by its insulated pad or mount it in a stand.
- Leaving the faces dirty. A film of oil or a fine chip between anvil and spindle turns directly into error when you are working to 0.01 mm.
Frequently asked questions
A standard mechanical micrometer reads to 0.01 mm. One turn of the thimble moves the spindle 0.5 mm and the thimble carries 50 divisions, so 0.5 / 50 = 0.01 mm. Models with a vernier scale on the sleeve can be read to 0.001 mm.
The travel of the spindle screw sets the range. That is why micrometers come in sets covering 0-25, 25-50 and 50-75 mm and so on; you pick the one that brackets the size you need to measure.
The ratchet limits the measuring force to a fixed value and slips once that force is reached. Without it the pressure varies from one measurement to the next, readings become inconsistent and usually come out undersized, and the excessive force will eventually damage the spindle thread. It should always be used.
A micrometer reads to 0.01 mm but covers only a 25 mm range and measures external dimensions only. A caliper reads to 0.05 or 0.02 mm, yet it handles external, internal and depth measurements over a far wider range with a single instrument. Use the micrometer where a tolerance has to be verified and the caliper for general sizes.
One turn of the thimble advances the spindle only 0.5 mm, so two full turns fit between consecutive millimetre marks. The half-millimetre row on the lower side of the sleeve tells you which of those two turns you are on. If that mark is showing you add 0.5 mm; miss it and the reading is exactly half a millimetre wrong.
Related Posts
 Balancing a Grinding Wheel. Grinding Wheel Balancing
  Band Saw Machine Work Instructions
  Types of Files – Lesson
  Countersinking and Countersink Drill
  How to Read a Micrometer
  Drilling Errors. Causes and Solutions
  Formulas for Gear Drawing and Manufacturing
  Drilling a Center Hole (Center Seat) on a Lathe