
The simulator above behaves like a real vernier caliper. Drag the sliding jaw to set any measurement, work out the reading yourself, then reveal the answer to check whether you got it right. The magnifier button zooms in on the vernier scale, which helps a great deal while you are still learning to spot the coinciding line.
Parts of a vernier caliper
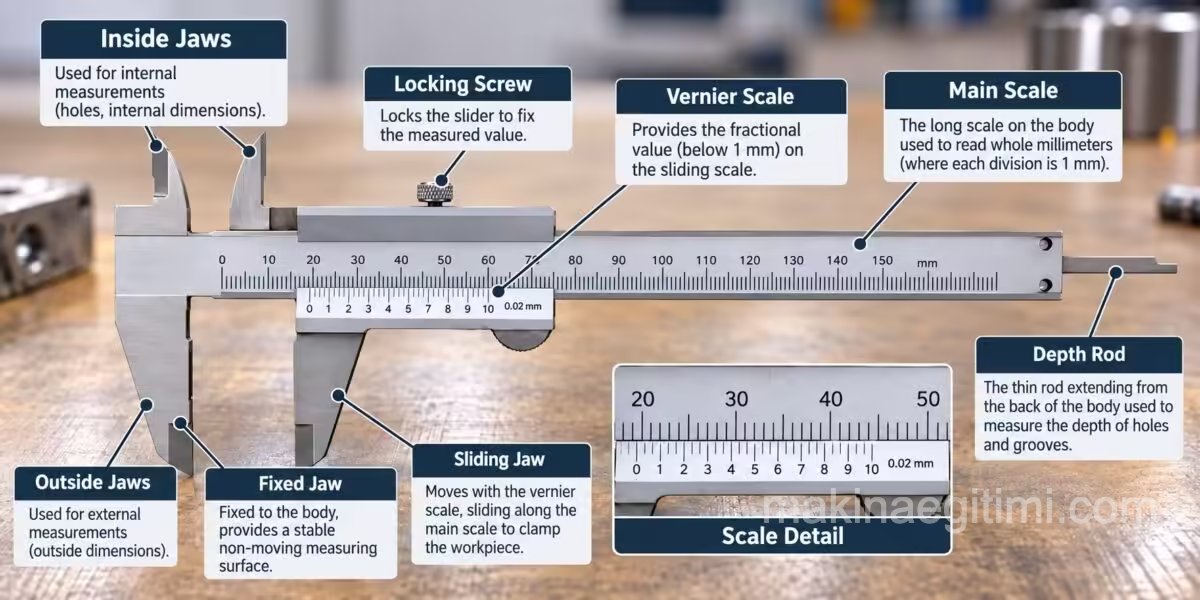
The body of the caliper carries a main scale graduated in millimetres. The part that slides along it is the vernier, and that is where the instrument’s precision actually comes from.
- Fixed jaw: the measuring face attached to the body; it never moves.
- Sliding jaw: moves with the vernier and closes onto the workpiece.
- Main scale: the long millimetre scale on the body, used for the whole-millimetre part of the reading.
- Vernier scale: the short scale on the slider that gives the fractional part.
- Depth rod: the thin rod that extends from the back of the body to measure hole and groove depth.
- Locking screw: clamps the slider so the reading does not shift while you look at it.
How to read a vernier caliper
Reading a caliper is a two-part job: the whole millimetres come from the main scale, the decimals from the vernier. Add them together and you have the measurement.
- Look at the zero line of the vernier. The last millimetre mark to its left is the whole-millimetre part of your reading.
- Find the one line on the vernier scale that lines up exactly with any line on the main scale. Only one of them truly does.
- Multiply that line’s number by the caliper’s resolution: 0.05 mm on a 1/20 caliper, 0.02 mm on a 1/50 caliper.
- Add the two figures together.
Example: the vernier zero sits between 64 and 65 mm, the 15th line of the vernier coincides with a main-scale line, and you are using a 1/20 caliper. The reading is 64 + (15 × 0.05) = 64.75 mm. The simulator shows this same calculation step by step underneath the result.

Related Post How to Read a Caliper. Caliper Reading Explained
Vernier caliper reading explained step by step. 1/10, 1/20, 1/50 caliper reading examples, questions and solutions, and how to find caliper precision.
1/20 versus 1/50 calipers
The resolution of a caliper depends on how many equal divisions the vernier is split into. On a 1/20 caliper the vernier has 20 divisions, so each one represents 1/20 = 0.05 mm. On a 1/50 caliper there are 50 divisions and each one stands for 1/50 = 0.02 mm. The finer instrument reads closer, but its vernier scale is physically longer and picking out the coinciding line takes more care. Switch between the two in the simulator and the difference becomes obvious straight away.
What you can measure with a caliper
- External dimensions: shaft diameters, sheet thickness, across-flats sizes. Use the large lower jaws.
- Internal dimensions: bore diameters and groove widths. The small upper jaws go inside the hole.
- Depth: blind holes and steps, measured with the depth rod at the back.
- Step height: the difference in level between two surfaces.
Common measuring mistakes
- Squeezing the jaws too hard. A caliper has no ratchet, so nothing limits the force you apply. Over-tightening gives an undersized reading and, over time, springs the jaws. The faces should just touch the part.
- Reading at an angle. If you do not look square at the scale, parallax makes you pick the wrong line. This is the single most common beginner error.
- Holding the jaws out of square. If the measuring faces are not parallel to the part, the reading comes out larger than the true size.
- Skipping the zero check. With the jaws fully closed, the vernier zero must line up with the main-scale zero. If it does not, the instrument is out of adjustment and every reading carries that error.
- Chips and dirt. A single fine chip trapped on a measuring face will shift the reading by hundredths of a millimetre.
Frequently asked questions
The two types you will meet most often in a workshop are 1/20 and 1/50 calipers, reading to 0.05 mm and 0.02 mm respectively. For anything finer you move to a micrometer, which reads to 0.01 mm.
The main scale first. The last millimetre mark to the left of the vernier’s zero gives you the whole-millimetre part. The decimal part then comes from the number of the vernier line that coincides with a main-scale line, multiplied by the caliper’s resolution.
Only one vernier line forms an unbroken straight run with a main-scale line; its neighbours drift slightly to the left and right. If you are unsure, look at the two lines either side: when one leans left and the other leans right, the line between them is the correct one. The magnifier in the simulator makes this much easier to see.
Almost always because the jaws were squeezed too hard. A caliper has no ratchet to limit the measuring force, so you have to control it by feel. Chips on the measuring faces and a caliper whose zero has drifted will push the reading the same way.
That is what the small upper jaws are for. Put them inside the bore and open them until they contact the wall. Rock the caliper gently and look for the largest value: if the jaws are not exactly on the diameter, the reading you get is smaller than the true bore.
Related Posts
How to Read a Caliper. Caliper Reading Explained  Information About Types of Gauges
 1/10 1/20 1/50 Caliper Reading Practice Questions
 How to Read a Micrometer
 1/10 Vernier Caliper Reading Online Test
 Micrometers. Parts, Types, and Maintenance of a Micrometer
 Micrometer Reading Examples
 Micrometer Simulator