Close Menu
  • MAKİNELER ve İMALAT
    • Tools & Equipment
    • Computer-Aided Drawing
    • CAD/CAM Education
    • CNC Machine Programming
    • Casting Technologies
    • Electrical & Electronics Technologies
    • Hydraulics & Pneumatics
    • Manufacturing Processes
    • Manufacturing Technologies
    • Occupational Safety
    • Mold & Die Design
    • Solid Modeling
    • Welding Technology
    • Machine Elements
    • Mechanical Trade Drawing
    • Materials Science
    • Automotive & Vehicle Technologies
    • Robotics Technologies
    • Health Technologies
    • Defense & Aerospace Technologies
    • Descriptive Geometry
    • Technical Drawing
    • Software & Hardware Technologies
    • Innovative Manufacturing Methods
  • TEKNOLOJİ ve YAŞAM
    • OTOMOBİLLER ve TAŞIT
      • Vehicle & Engine Knowledge
      • Safe Driving
      • Sürüş Destek Sistemleri
    • Genel Kültür
      • Movies & TV Shows
      • Görsel ve Grafik Sanat
      • Books & Literature
      • Music
      • Sports
      • History
      • History of Technology
    • GÜNDELİK YAŞAM TEKNOLOJİLERİ
    • Hobbies & Entertainment
    • Internet Technologies
    • Health
    • Mobile Technologies
Makine Eğitimi
  • Machines & Manufacturing
    Machine Elements
    Hydraulics & Pneumatics
    Technical Drawing
    Computer-Aided Design & Manufacturing
    Basic Manufacturing Processes
    Manufacturing Processes
    Industry Technologies
    Other Technical Courses
    Motion & Power Transmission
    Simple Machines
    Chains & Sprockets
    Shafts & Journals
    Gears
    Cams
    Couplings
    Belts & Pulleys
    Springs
    Bearings
    Keys
    Fastening Joining
    Retaining Rings
    Screws, Bolts & Nuts
    Cotter Pins
    Flanges
    Welding
    Rivets
    Pins & Bolts
    Washers
    Calculators
    Gear Ratio Calculator
    Spring Constant Calculator
    Belt Pulley Ratio Calculator
    Other Machine Elements
    Slides & Linear Guides
    Brakes
    Flywheels
    Clamps
    Shock Absorbers
    Gaskets & O-Rings
    Seals & Sealing Elements
    Hydraulics
    Introduction to Hydraulics & Principles
    Hydraulic Systems & Applications
    Accumulators
    Filters
    Motors
    Pumps
    Valves
    Pneumatics
    Introduction to Pneumatics & Principles
    Pneumatic Systems & Applications
    Pneumatic Circuit Components
    Valves
    Cylinders
    Silencers
    Motors
    Compressors
    Dryers
    Conditioning Units
    Common Topics & Maintenance
    Hydraulic & Pneumatic Maintenance
    Study Notes, Exams & Tests
    Technical Drawing
    Introduction to Technical Drawing
    Geometric Drawings
    Perspective & Projection
    Orthographic Views
    Dimensioning
    Sectioning
    Assembly & Detail Drawings
    Tolerances
    Surface Finish Symbols
    Mechanical Engineering Drawing
    Screws, Bolts & Nuts
    Pulley Drawings
    Gear Drawings
    Shafts & Journals
    Bearing Drawings
    Pins & Bolts
    Spring Drawings
    Welds in Technical Drawing
    Washers
    Cotter Pins
    Technical Drawing Exercises
    Mechanical Drawing Exercises
    Gear Exercises
    View Extraction Exercises
    Pulley Exercises
    Pin & Bolt Exercises
    Threaded Fastening Exercises
    Descriptive Geometry
    Computer-Aided Drawing
    AutoCAD Drawing Lessons
    Computer-Aided Drawing Exams
    Solid Modeling & Animation
    Solid Model Drawing Files
    Solid Model Assembly Examples
    Solid Model Drawing Lessons
    3D CAD Software Reviews
    Solid Modeling Exercises
    CNC Programming
    CAM
    Measurement & Inspection
    Dial Indicators
    Calipers
    Gauges
    Micrometers
    Materials Science
    Steels
    Cast Iron
    Aluminum
    Plastics
    Material Testing & Hardness Measurement
    Occupational Safety
    Workshop Safety
    Safety When Working With Electricity
    Machine Safety Rules
    Hand Operations
    Filing
    Marking
    Cutting Operations
    Reaming
    Tapping
    Threading With a Die
    Drill Bit Sharpening
    Working With Machines
    Basic Turning Operations
    Basic Milling Operations
    Shaper Machine
    Machining
    Turning
    Milling
    Grinding
    Innovative Manufacturing Methods
    EDM (Electrical Discharge Machining)
    Laser Machining
    Waterjet Machining
    3D Printing
    3D Scanners
    Welding
    Rolling
    Casting
    Mold & Die Design
    Mechanical & Hydraulic Presses
    Blanking & Piercing Dies
    Bending Dies
    Drawing Dies
    Plastic Injection Molds
    Extrusion Dies
    Compound Dies
    Progressive Dies
    Blow Molds
    Spinning Dies
    Spray Molds
    Manufacturing of Machine Parts
    Automotive & Vehicle Technologies
    Motor Vehicle Manufacturing
    Raw Material Production
    History of Technology
    Health & Medical Technologies
    Defense & Aerospace
    Robotics Technologies
    Software & Hardware Technologies
    Mechanics - Strength of Materials
    Physics Topics
  • Technology & Life
    Hobbies & Entertainment
    Sports
    Music
    Vehicle & Engine Knowledge
    Vehicle Maintenance & Repair
    Safe Driving
    Driver Assistance Systems
    History
    Movies & TV Shows
    Books & Literature
    Computers & Internet
    Computer Tips
    Software Reviews
    Hardware & Peripherals
    Practical & Safe Internet Use
    Visual & Graphic Art
    Mobile Technologies
    Travel
    Science
    Health
    First Aid Knowledge
    Everyday Technologies
Makine Eğitimi
Home»Technical Drawing»How to Do Sectioning in Technical Drawing
29 August 2026

How to Do Sectioning in Technical Drawing

Teknik Resimde Kesit Alma Nasıl Yapılır

In the technical drawing lessons category, in this article, we’ll cover sectioning in technical drawing, the purpose of sectioning, how sectioning is done for complex parts with internal holes or cavities that work together and form a partial (sometimes full) assembly, the cutting plane, and the logic behind sectioning.

  • Sectioning
    • Purposes of Sectioning
      • To make the structure of parts containing holes, grooves, etc. more understandable
      • To make dimensioning easier
    • How Is Sectioning Done?
    • Step 1 in Sectioning
    • Step 2 in Sectioning
    • Step 3 in Sectioning
    • What Does the “A-A” Notation (Section A-A) Mean in Sectioning?
      • Related Topics

Sectioning

Many of us have tried opening up a machine that seemed complex to us to understand how it works. If we could see complex machines (like a car, for example) split in half, we’d understand how these machines work much better.

car cross-section. car split down the middle

The sectioning topic we’ll cover here is exactly about this. Sectioning is perhaps the most enjoyable topic in technical drawing lessons. It appeals to and develops our imagination.

Purposes of Sectioning

Views in which an object is assumed to be cut, and its otherwise invisible interior sections are shown as visible, are called a “Sectional View.” In the “View Extraction” learning activity, we explained that when the views of a part to be manufactured are drawn, invisible areas remaining on the interior are drawn with thin dashed lines. Sectioning is performed so that these invisible details become visible, understandable, and can be dimensioned. This process is done only in our imagination and then transferred to the drawing. In other words, the part to actually be manufactured is not literally cut.

To make the structure of parts containing holes, grooves, etc. more understandable

If a part’s interior has holes or cavities, or its exterior has excessive protrusions and recesses, it’s difficult, sometimes even impossible, to represent parts of this type with one or a few views.

sectioning a valve

In such drawings, since the dashed lines drawn for invisible edges alongside the solid lines would cause confusion, understanding the part becomes difficult. For this reason, instead of drawing a picture full of dashed lines, a section of the parts is taken along a suitable plane (this is usually a plane of symmetry).

sectioning a spur gear

To make dimensioning easier

In the figure above, a perspective view of a spur gear is shown, along with the sectioning plane needed to dimension the gear’s elements. This way, when the spur gear is cut symmetrically right through its center, it will be much easier to show and dimension the gear’s hub, the keyway, the root diameter, and the tip diameter.

How Is Sectioning Done?

To take a section, as stated in the definitions, assuming a part is cut along a plane (or planes), the portion of the part in front of the cutting plane is discarded, and the orthogonal projection of the remaining portion onto that cutting plane is drawn.

Let’s say we have a part like the one above. When we look at the part isometrically from above and below, let’s say the views look like this.

Would you like to rotate the part to examine it? Play the video above

If we wanted to draw this part without sectioning, a drawing like the one above would result. The excess of dashed lines and the difficulty of imagining the part’s shape stand out.

Step 1 in Sectioning

First, where the part to be sectioned will be cut is determined. The cutting plane is indicated as A-A as shown above.

When determining where to take the section, the aim is to reveal, as much as possible, the details that are difficult to understand with a normal drawing (such as holes, grooves, internal details).

Step 2 in Sectioning

Then, after the part is cut, the front half is removed so the cut surface becomes visible.

Step 3 in Sectioning
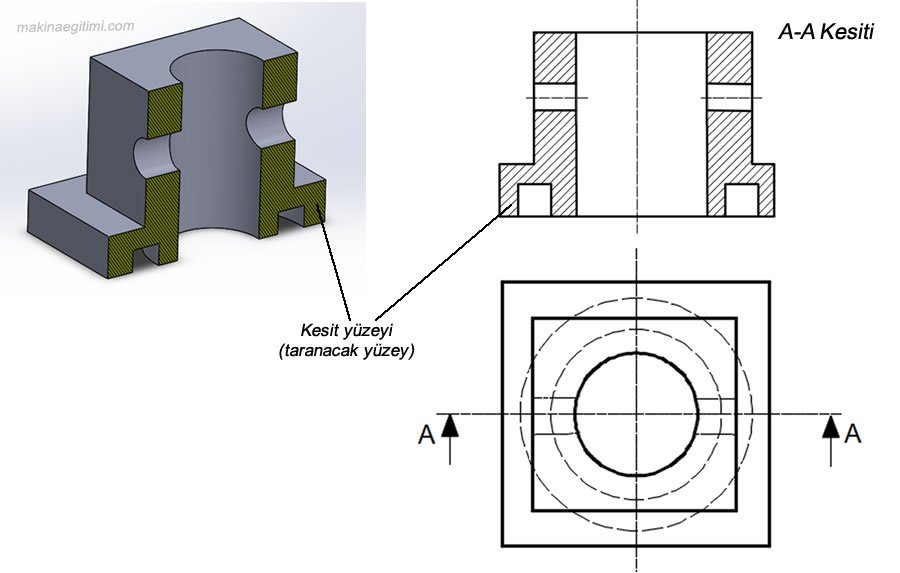
The front portion of the part is discarded, and with only the remaining portion left, the view perpendicular to the cutting plane of this portion is drawn. Regions cut by the cutting plane that are solid material are usually hatched with 45° hatching lines

In this drawing, all lines belonging to visible edges are drawn solid, and the regions cut by the cutting plane are hatched.

Video of how sectioning is done

What Does the “A-A” Notation (Section A-A) Mean in Sectioning?

Sections are usually shown as front views. (as in the image above) In the top view, how and where the cutting plane divides the part is expressed with letters, in the form A-A. When taking a section, we assumed we separated the part with a large saw. The letters A-A here represent the two ends of the saw.

In technical drawing, it may not always be Section A-A. Sometimes, for complex parts, a second cutting plane may also be used, and in that case, the letters B-B are used for that cutting plane.

In stepped sections (cases where the cutting plane isn’t a straight line), a cutting plane expressed as A-B-C-D is also used. The topic of stepped sections will be covered in other articles.


In this article, we covered sectioning in technical drawing. We focused on details such as the purpose of sectioning, how sectioning is done, what a cutting plane is, and the logic behind sectioning. Since this article focused on the basic sectioning method, we didn’t cover methods other than the FULL SECTION method.

To examine other sectioning methods, see the Related Topics section

Related Topics

Sectioning Methods

Related Posts

Tolerance Terms and Their Meanings in Mechanical Engineering Tolerance Terms and Their Meanings in Mechanical Engineering Technical Drawing Paper Types Technical Drawing Paper Sizes and Folding Hole and Shaft Tolerances Hole and Shaft Tolerances Technical Drawing Instruments and Equipment Technical Drawing Instruments and Equipment Isometric Drawing Examples 2 Dimensioned Isometric Drawing Examples – Part 2 Geometric Drawings 1 - Dividing Lines and Erecting Perpendiculars Geometric Drawings 1 – Dividing Lines and Erecting Perpendiculars Isometric drawing examples 1 Dimensioned Isometric Drawing Examples – Part 1 Choosing Tolerance Zones and Fits Choosing Tolerance Zones and Fits
Sectioning
Share. Facebook Twitter WhatsApp Tumblr Email Telegram Copy Link

Leave A Reply Cancel Reply


Napoleon Bonaparte: How a Child of an Island Became the Master of Europe
Inspection and Replacement Times for Vehicle Parts
  • Contact
  • Terms of Service
  • Privacy & Cookie Policy

Type above and press Enter to search. Press Esc to cancel.