

Reaming
This article will cover what reaming is and how it’s done. It will cover the reaming process steps and the rules of reaming.
Reaming is a process done to bring a hole to the desired size with a precise surface finish. A hole drilled with a drill bit is neither exactly the right size, nor can the required surface smoothness be achieved for precision work. If a precise, smooth surface is desired, the hole is first drilled slightly undersized. It’s then reamed to bring it to its final size.
Reaming Process Steps
- The workpiece is marked and clamped to the table with a suitable clamping element.
- A hole is drilled 0.1–0.5 mm undersize, depending on the desired precision.
- We set the machine to half the spindle speed used for drilling the hole.
- The reamer is mounted to the spindle with a Morse taper sleeve.
- The reamer is turned clockwise.
- The reamer is lowered into the hole at a suitable speed.
- After checking the dimension, the part is removed.

Rules of Reaming
1. The reaming allowance left for the hole to be reamed should never exceed its normal value. If this isn’t followed;
the tool’s service life will be shortened.
2. The reamer handle (tap wrench) should be suited to the reamer’s shank. If the handle’s hole is too loose for the reamer’s head,
you won’t be able to control the reamer, and you won’t be able to feel how it’s cutting.
3. The reamer should be turned by holding it perpendicular to the work and pressing down with equal force from both hands. If this isn’t followed during reaming; the mouth of the hole will widen, and the hole can even be ruined.
4. A reamer should never be removed by turning it against the cutting direction. If turned the other way, chips get jammed between the cutting edges and the hole surface, scratching the surface of the hole. When removing the reamer, it should be turned in the cutting direction while being pulled upward at the same time, without pressing down.

5. As much as possible, the reamer should be run through and completed in a single pass. If the reamer is pulled out and lowered back in several times, the surface of the hole gets damaged. If you need to clean the reamer, it should be cleaned with a fine brush and kerosene.
6. A helical reamer is used for holes with a keyway or any other slot cut into them. Because a cylindrical reamer’s cutting edge would stay engaged in material removal along the entire slot, it would both be under great strain and face the risk of breaking.
7. Keep in mind that when reaming on a machine, the spindle speed should be kept low (at most 1/3 of the speed used for drilling the hole), and when reaming hard steels, the cutting speed shouldn’t exceed 3-5 m/min.
Precision Hole Finishing
Reaming is a process used to finish a previously drilled hole to its final size with a smooth surface.
Small Cutting Allowance
A reamer is typically used to reach a precise final size by leaving a very small cutting allowance, such as 0.1-0.3 mm.
Low Speed Requirement
Reaming is usually done at low spindle speed and with plenty of coolant to preserve surface quality.
How Is Reaming Done
A reamer’s cutting edges move lengthwise along the axis of the hole. For the cutting edges to remove material well, they need to touch the hole’s surface with a narrow strip. For this reason, the backs of the cutting edges are relieved, leaving a narrow land running the full length of the edge. If a reamer is carefully inserted into a previously drilled hole and turned, the cutting edges remove a very fine chip from the surface of the hole.
To let the reamer be easily inserted into a hole smaller than its own diameter, the tip is made conical. This is called the starting (lead-in) taper, and this tip is what does the cutting.
Since the reamer isn’t pressed forcefully during reaming, it can jam inside the hole and the edges dig into the material. In this case, as many gouge marks form on the surface of the hole as the reamer has cutting edges. In this case, the reamer should be loosened and the operation continued again.
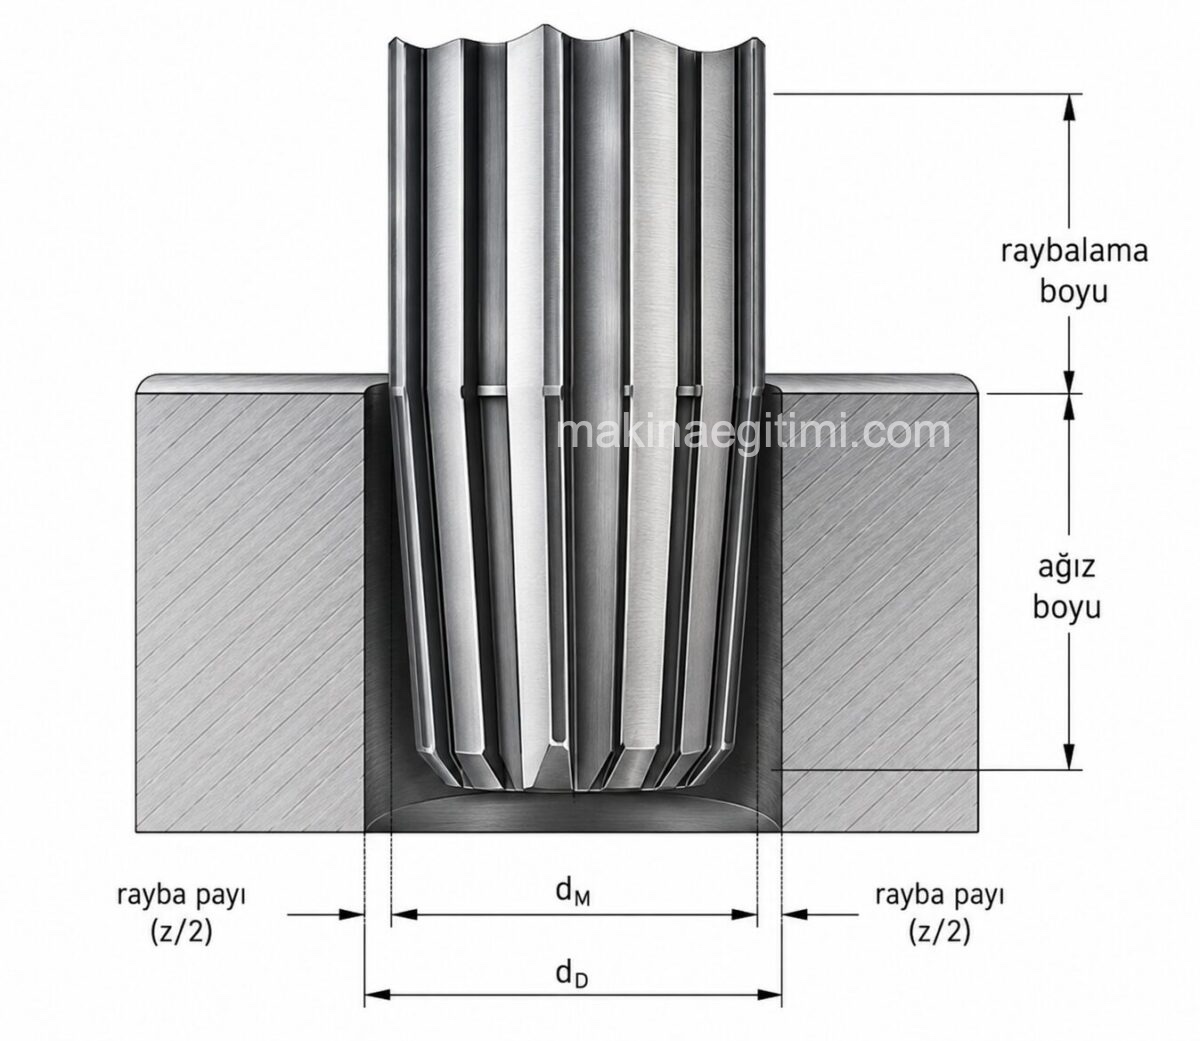
The land surfaces on the cylindrical portion guide the reamer. Machine reamers have their tips made with various taper angles depending on their diameter.
Their length is usually chosen to be short. Tapered reamers also don’t need a starting cutting tip, because the taper lets the reamer enter the hole easily.
Because of their taper, these reamers face strain and can break easily, since the cutting edge engages the material along its entire length. For this reason, tapered reamers need to be used carefully.
How to Set the Hole Diameter/Reaming Allowance by Material
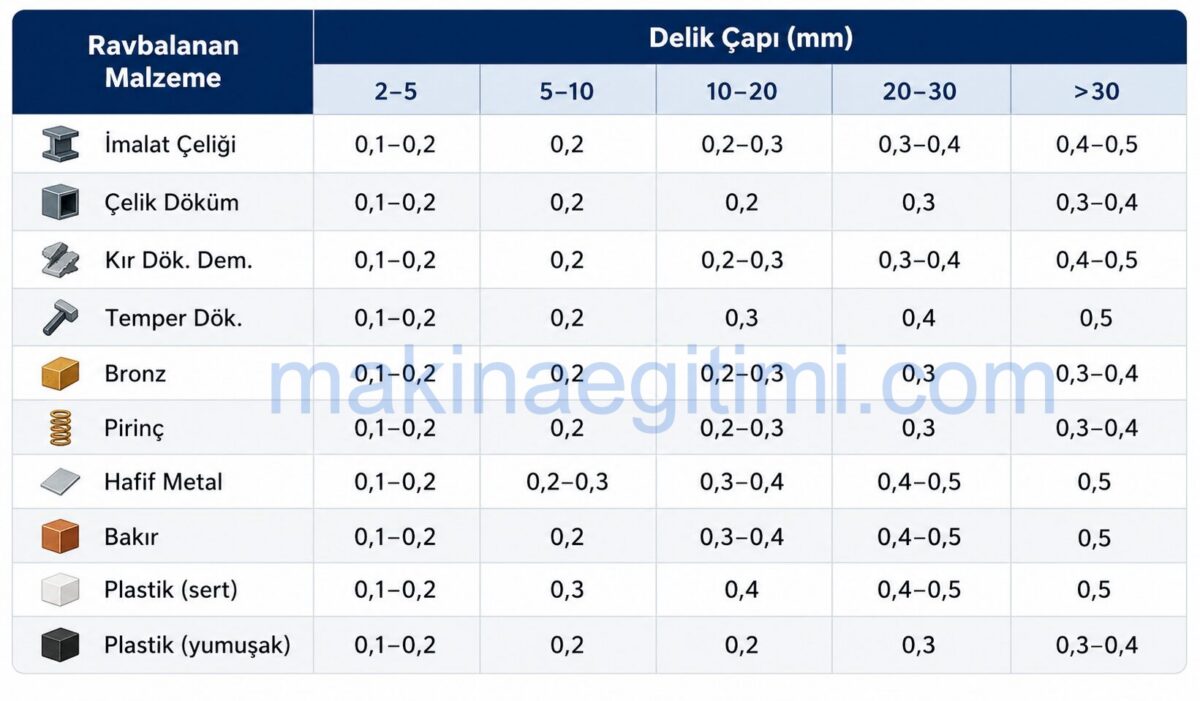
How Is Reaming Done with Expansion Reamers?
Since the diameter of the hole being machined will equal that of the reamer, the diameter of the reamer to be used should be checked with special rings before reaming begins.
Like any cutting tool, reamers also dull after being used for a certain time. To be usable again, they need to be resharpened. But a resharpened reamer’s diameter becomes smaller.
The diameters of reamed holes will equal the reamer’s diameter after resharpening. So reamers can only be used to enlarge holes to certain sizes for a certain period of time.

For this reason, expansion reamers were made, which can be adjusted within certain size limits after being resharpened.
Expansion reamers can be adjusted according to certain tolerances, based on their nominal diameter. This adjustment uses rings matching the desired tolerance. The correctly sized ring should slide very smoothly over the reamed hole, so the diameter of the hole the reamer produces is the desired size.
How Is Reaming Done with Adjustable Reamers?
In adjustable reamers, the inserted blades can be adjusted to the desired diameter within certain limits by moving them within tapered grooves. After the blades are ground round and sharpened, the burr is carefully removed with an oil stone.

How Is Reaming Done with Inserted-Blade Reamers?
Adjustable inserted-blade reamers should be set, by loosening and tightening the adjustment nuts, so they slide very smoothly into the ring matching the desired diameter. Special attention should be paid to making sure the nuts are properly tightened when adjustment is finished, and that the right wrench is chosen for this job.
Related Questions
If a reamer’s cutting edges are evenly spaced, when the reamer is loosened and turned again, the edges land back in the same spots and the reamer jams inside the hole. A hole enlarged with this kind of reamer ends up with a rippled surface, and it’s also harder to machine. This is called reamer chatter.
To prevent reamer chatter, the reamer’s cutting edges should be spaced unevenly around its circumference. When a reamer made this way jams inside the hole and creates gouge marks, if it’s loosened and turned again, the edges won’t land back in their previous spots, so reaming continues easily. A reamer like this leaves the hole’s surface clean and ripple-free.
Reaming is usually done at low spindle speed and with plenty of coolant to preserve surface quality.
To extend the reamer’s service life, using a boron oil emulsion mixed with 20% water during reaming gives very good results.
However, cutting oil shouldn’t be used when reaming materials like gray cast iron and bakelite.
Reamers that dull after a certain amount of use are sharpened on the back (relief face) of the cutting edges. Reamers aren’t sharpened on the back surfaces of the guide lands. Otherwise, the reamer’s diameter would decrease.
Related Posts
 Laser Cleaning: Removing Rust, Dirt, and Grease
  Surprising Manufacturing Processes in Modern Factories
  Waterjet Cutting Basics
  Professional 3D Scanners and Their Applications
  What Is Spot Welding. How Is It Done?
  What Is Rolling? How Is It Done? Rolled Products in Our Lives
  Plastic Injection Molding
  What Is Submerged Arc Welding, How Is It Done