This article explains step by step how spring winding is done on a lathe. It also covers the parts of a spring, the mandrel diameter sizes used for spring winding, and a titled practice-drawing exercise for a spring-winding workpiece.
What’s Needed and the Calculations for Spring Winding on a Lathe
What’s needed for this operation: a 3-jaw universal chuck, a shaft to be used as the mandrel, two wooden blocks, and enough wire. Their dimensions are given below.
Preparing the Spring-Winding Mandrel
The spring is wound around a shaft called the mandrel. After winding, once the spring is released, it expands slightly. In practice, this amount is about 20% of the spring’s inside diameter.
Mandrel diameter = di-(0.20 . di)
di = spring inside diameter
For example, for a spring with an inside diameter of 20 mm, the required mandrel diameter must be smaller by 20 × 0.20 = 4 mm. That is, 20-4 = 16 mm
Wire Length Calculation
Required wire length
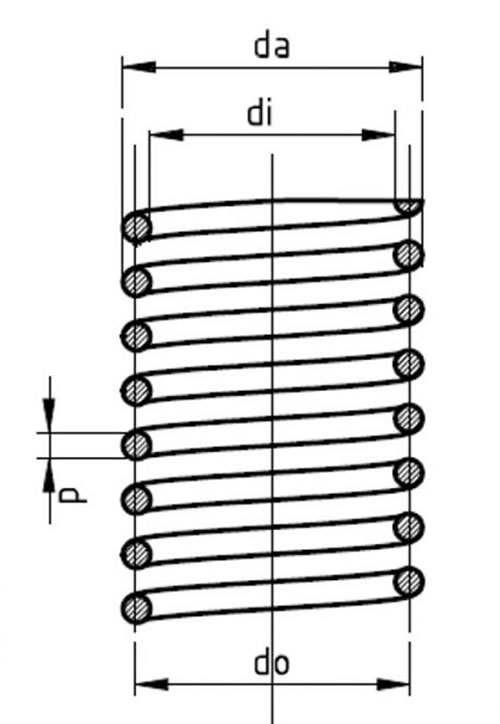
L = p . z + e
P = the spring’s pitch (equal to the diameter of the spring wire)
z = number of turns
e = the mounting allowance left at each end
Calculating e (mounting allowance)
e = 4 . π . di
This calculation will give a suitable result, but in practice, workers generally decide on the mounting allowance based on their own experience rather than calculating it.
Mandrel Diameter Calculation
The mandrel diameter used in spring winding must be precisely calculated based on the desired spring inside diameter.
Checking Wire Tension
Keeping the wire under constant tension during winding ensures the spring’s coils are even and uniform.
Material Spring-Back Allowance
Since spring material shows a certain amount of spring-back after winding, this allowance must be factored into the calculation.
Order of Operations for Spring Winding on a Lathe
1. A hole the diameter of the wire is drilled in the end of the mandrel closest to the chuck. The mandrel is mounted in a 3-jaw universal chuck and the other end is supported with a traveling (tailstock) center. The tailstock center tip must not apply too much pressure (especially for long springs). Excessive pressure risks bending a long mandrel.

2. To support the wire and provide tension, 2 wooden blocks are attached to the tool post. On one of the wooden blocks, a groove is cut about 0.5 mm smaller than the wire diameter.
A sufficient length of wire is cut and one end is inserted into the hole on the mandrel. The tool post bolts should be tightened so the wire passes between the wooden blocks with adequate tightness.
3. The machine’s spindle speed is reduced (10-50 rpm).
4. The machine is set so the leadscrew and chuck rotate in the correct direction. The carriage feed is set up like cutting a thread, moving from left to right according to the spring’s pitch.
NOTE: For extension (tension) springs, the spring’s pitch equals the wire diameter.

5. The chuck is rotated about 1 turn by hand, preventing the wire from slipping out of the hole.
6. The half-nut lever is engaged and the spring is wound from left to right, as if cutting a left-hand thread (the chuck should rotate clockwise).
7. When winding is finished, the machine is stopped and the half-nut lever is disengaged.

8. Before cutting the wire, the chuck is turned back about 1 turn, which relieves the tension and prevents the spring from springing off.
9. The wire is cut off with a chisel or pliers and the end face is dressed on a grinding wheel.

If a tension (extension) spring has been wound, its end sections are bent into a loop 90° from center. The loops at both ends must be bent so they sit 90° apart from each other.
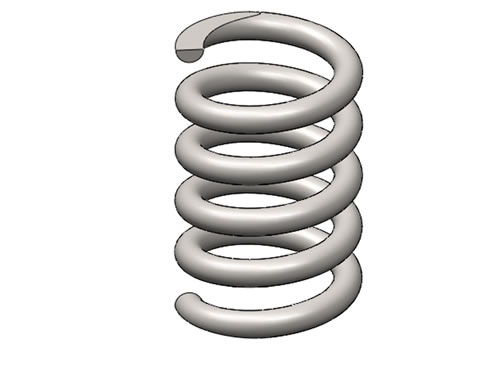
The end sections of compression springs are ground flat. At the base of the spring, three-quarters of the last coil should sit flush against the surface.
Videos of Spring Winding on a Lathe


Spring Winding on a Lathe Practice Workpiece Exercise

Titled Practice-Drawing Exercise for Spring Winding on a Lathe
PDF // AutoCAD DWG
Related Questions
When the wire is released from the mandrel, it naturally expands slightly. To compensate for this expansion, the mandrel is made a certain proportion smaller than the targeted spring inside diameter.
The ends of the wound spring need to be fastened or attached to something during assembly. This extra allowance ensures the spring has a usable connection end.
Related Posts