Close Menu
  • MAKİNELER ve İMALAT
    • Tools & Equipment
    • Computer-Aided Drawing
    • CAD/CAM Education
    • CNC Machine Programming
    • Casting Technologies
    • Electrical & Electronics Technologies
    • Hydraulics & Pneumatics
    • Manufacturing Processes
    • Manufacturing Technologies
    • Occupational Safety
    • Mold & Die Design
    • Solid Modeling
    • Welding Technology
    • Machine Elements
    • Mechanical Trade Drawing
    • Materials Science
    • Automotive & Vehicle Technologies
    • Robotics Technologies
    • Health Technologies
    • Defense & Aerospace Technologies
    • Descriptive Geometry
    • Technical Drawing
    • Software & Hardware Technologies
    • Innovative Manufacturing Methods
  • TEKNOLOJİ ve YAŞAM
    • OTOMOBİLLER ve TAŞIT
      • Vehicle & Engine Knowledge
      • Safe Driving
      • Sürüş Destek Sistemleri
    • Genel Kültür
      • Movies & TV Shows
      • Görsel ve Grafik Sanat
      • Books & Literature
      • Music
      • Sports
      • History
      • History of Technology
    • GÜNDELİK YAŞAM TEKNOLOJİLERİ
    • Hobbies & Entertainment
    • Internet Technologies
    • Health
    • Mobile Technologies
Makine Eğitimi
  • Machines & Manufacturing
    Machine Elements
    Hydraulics & Pneumatics
    Technical Drawing
    Computer-Aided Design & Manufacturing
    Basic Manufacturing Processes
    Manufacturing Processes
    Industry Technologies
    Other Technical Courses
    Motion & Power Transmission
    Simple Machines
    Chains & Sprockets
    Shafts & Journals
    Gears
    Cams
    Couplings
    Belts & Pulleys
    Springs
    Bearings
    Keys
    Fastening Joining
    Retaining Rings
    Screws, Bolts & Nuts
    Cotter Pins
    Flanges
    Welding
    Rivets
    Pins & Bolts
    Washers
    Calculators
    Gear Ratio Calculator
    Spring Constant Calculator
    Belt Pulley Ratio Calculator
    Other Machine Elements
    Slides & Linear Guides
    Brakes
    Flywheels
    Clamps
    Shock Absorbers
    Gaskets & O-Rings
    Seals & Sealing Elements
    Hydraulics
    Introduction to Hydraulics & Principles
    Hydraulic Systems & Applications
    Accumulators
    Filters
    Motors
    Pumps
    Valves
    Pneumatics
    Introduction to Pneumatics & Principles
    Pneumatic Systems & Applications
    Pneumatic Circuit Components
    Valves
    Cylinders
    Silencers
    Motors
    Compressors
    Dryers
    Conditioning Units
    Common Topics & Maintenance
    Hydraulic & Pneumatic Maintenance
    Study Notes, Exams & Tests
    Technical Drawing
    Introduction to Technical Drawing
    Geometric Drawings
    Perspective & Projection
    Orthographic Views
    Dimensioning
    Sectioning
    Assembly & Detail Drawings
    Tolerances
    Surface Finish Symbols
    Mechanical Engineering Drawing
    Screws, Bolts & Nuts
    Pulley Drawings
    Gear Drawings
    Shafts & Journals
    Bearing Drawings
    Pins & Bolts
    Spring Drawings
    Welds in Technical Drawing
    Washers
    Cotter Pins
    Technical Drawing Exercises
    Mechanical Drawing Exercises
    Gear Exercises
    View Extraction Exercises
    Pulley Exercises
    Pin & Bolt Exercises
    Threaded Fastening Exercises
    Descriptive Geometry
    Computer-Aided Drawing
    AutoCAD Drawing Lessons
    Computer-Aided Drawing Exams
    Solid Modeling & Animation
    Solid Model Drawing Files
    Solid Model Assembly Examples
    Solid Model Drawing Lessons
    3D CAD Software Reviews
    Solid Modeling Exercises
    CNC Programming
    CAM
    Measurement & Inspection
    Dial Indicators
    Calipers
    Gauges
    Micrometers
    Materials Science
    Steels
    Cast Iron
    Aluminum
    Plastics
    Material Testing & Hardness Measurement
    Occupational Safety
    Workshop Safety
    Safety When Working With Electricity
    Machine Safety Rules
    Hand Operations
    Filing
    Marking
    Cutting Operations
    Reaming
    Tapping
    Threading With a Die
    Drill Bit Sharpening
    Working With Machines
    Basic Turning Operations
    Basic Milling Operations
    Shaper Machine
    Machining
    Turning
    Milling
    Grinding
    Innovative Manufacturing Methods
    EDM (Electrical Discharge Machining)
    Laser Machining
    Waterjet Machining
    3D Printing
    3D Scanners
    Welding
    Rolling
    Casting
    Mold & Die Design
    Mechanical & Hydraulic Presses
    Blanking & Piercing Dies
    Bending Dies
    Drawing Dies
    Plastic Injection Molds
    Extrusion Dies
    Compound Dies
    Progressive Dies
    Blow Molds
    Spinning Dies
    Spray Molds
    Manufacturing of Machine Parts
    Automotive & Vehicle Technologies
    Motor Vehicle Manufacturing
    Raw Material Production
    History of Technology
    Health & Medical Technologies
    Defense & Aerospace
    Robotics Technologies
    Software & Hardware Technologies
    Mechanics - Strength of Materials
    Physics Topics
  • Technology & Life
    Hobbies & Entertainment
    Sports
    Music
    Vehicle & Engine Knowledge
    Vehicle Maintenance & Repair
    Safe Driving
    Driver Assistance Systems
    History
    Movies & TV Shows
    Books & Literature
    Computers & Internet
    Computer Tips
    Software Reviews
    Hardware & Peripherals
    Practical & Safe Internet Use
    Visual & Graphic Art
    Mobile Technologies
    Travel
    Science
    Health
    First Aid Knowledge
    Everyday Technologies
Makine Eğitimi
Home»Manufacturing Processes»Cutting with a Hacksaw
29 August 2026

Cutting with a Hacksaw

El Testeresi ile Kesme Doğru teknikler

Hacksaws and Their Parts

There are types of hand saws for cutting wood and metal. They are cutting tools shaped like a thin blade, toothed on one or both edges.
The topics covered in this article are as follows:


  • Hacksaws and Their Parts
    • Saw Frames
    • Saw Blades
    • Tooth Pitch on a Saw Blade
    • Choosing a Blade According to the Material to Be Cut
  • Rules for Cutting with a Hacksaw
  • Saw Maintenance
  • Safety Precautions When Cutting with a Hacksaw
parts of a wood saw
parts of a metal saw, hacksaw

Saw Frames

Used to mount the cutting blade for hand cutting operations. There are two types: fixed saw frames and adjustable saw frames. Adjustable ones can be adjusted to fit saw blades 200-400 mm in length.

Saw Blades

characteristics of a saw blade

Made of tool steel (WS) or high-speed steel (HSS), their outer sections are hardened for durability. They are toothed on one or both edges.

The shape, angles, and set of the teeth are varied depending on the properties of the material to be cut.

If the tooth pitch is small, the teeth will be finer and more numerous, so the cutting durability increases. For this reason, a higher tooth count (small pitch) is chosen for hard materials, and a lower tooth count (large pitch) for soft materials.

To prevent the saw blade from overheating and binding in the kerf it cuts, the teeth are set. Setting the teeth individually or in groups makes the kerf wider than the blade thickness.

front and top view of a saw blade. saw teeth

Tooth Pitch on a Saw Blade

The coarseness or fineness of saw teeth is expressed by the number of teeth per inch (1″), in short, the saw’s pitch. The saw’s pitch is obtained by dividing the length of one inch by the number of teeth in that inch.

saw teeth and pitch

Choosing a Blade According to the Material to Be Cut

blade selection

Solid materials are cut with coarse-tooth saws. Hollow materials with thick walls are cut with medium-tooth saws. Thin materials like pipe and sheet metal are cut with small-pitch saws.

choosing a saw blade based on material

Rules for Cutting with a Hacksaw

The following points should mainly be observed when cutting with a saw:

For a smooth cut, the saw teeth must face forward and be tensioned adequately with the wing nut. (Neither too little, nor too much)

To start the cut, a guide notch should be opened by tilting the saw forward at an angle of about 5-10°. To open this notch, the saw blade can be rested against the thumb, or a triangular file can also be used. The saw should be drawn under its own weight until it makes its own mark.

cutting with a saw, hacksaw

While the saw is pushed forward with the left hand, the right hand applies just enough pressure to cut; the left hand also provides balance. Pressure is released while the saw is drawn back. The return stroke speed is faster than the cutting speed.

The part should be cut correctly, following the marking line. (Be careful not to cut exactly along the marking line.)

Parts should be cut on their wider surface. On a narrow surface, since fewer teeth will be doing the cutting, the saw blade is strained.
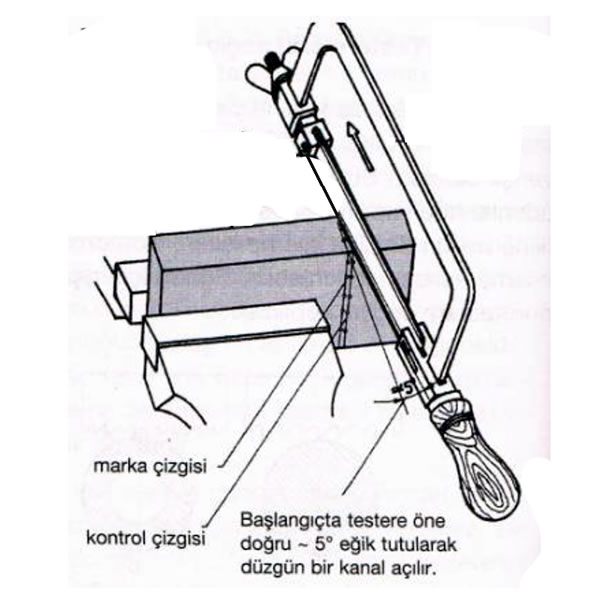
cutting with a hacksaw

The workpiece should be clamped so that it doesn’t vibrate during cutting, and should not overhang the vise jaws by too much. If cutting is done far from the vise jaws, a shrill and unpleasant noise occurs.

Oil should not be used when cutting with hand saws. This is because oil prevents the chips from flowing out and causes them to jam.

During cutting, the full length of the saw should be used; only a portion of the saw shouldn’t be used.

rules for cutting with a hacksaw

When cutting thin parts with a wide surface, the cut is made from the wide surface. If cut from the narrow surface, the pressure force will be distributed among fewer teeth, increasing the force on each individual tooth. In this case, the teeth may break.

Saw Maintenance

As with all other sheet metal materials, storing saw blades lightly oiled is suitable to prevent rusting.

This is related to using saws in accordance with technological rules; mistakes should not be made, but potential errors should also be known.

After finishing the cutting operation, the saw’s wing nut is loosened by about one turn. This is to prevent the saw blade from remaining constantly under tension. A blade left under tension for a long time becomes fatigued and breaks more easily.

Safety Precautions When Cutting with a Hacksaw

  • Cutting should not be continued with a different blade in a kerf started by another blade. This causes binding and breakage.
  • The part should not be snapped off toward the end of the cut. Otherwise, the part will fly off and create a hazard.
  • If pressure isn’t reduced toward the end of the cut, the saw suddenly breaking free can cause an accident.
  • Cutting position, cutting height, and body balance should be appropriate.
  • Cutting speed should be set to around 60 strokes per minute.

Related Posts

Formulas for Gear Drawing and Manufacturing Formulas for Gear Drawing and Manufacturing Groove Turning Groove Turning What Is Reaming? How Is It Done? What Is Reaming? How Is It Done? Tornada Kesme Hızı ve Devir Sayısı Cutting Speed and RPM on a Lathe Drilling and Boring on a Lathe Drilling and Boring on a Lathe Work Instructions for a Bench Grinder Work Instructions for a Bench Grinder Drilling Errors, featured image Drilling Errors. Causes and Solutions How to Read a Micrometer How to Read a Micrometer
Hand Operations Cutting Operations
Share. Facebook Twitter WhatsApp Tumblr Email Telegram Copy Link

Leave A Reply Cancel Reply


Parts of the Engine, Illustrated Explanation
Spark Plug Oil Fouling: Causes and Symptoms
  • Contact
  • Terms of Service
  • Privacy & Cookie Policy

Type above and press Enter to search. Press Esc to cancel.