Close Menu
  • MAKİNELER ve İMALAT
    • Tools & Equipment
    • Computer-Aided Drawing
    • CAD/CAM Education
    • CNC Machine Programming
    • Casting Technologies
    • Electrical & Electronics Technologies
    • Hydraulics & Pneumatics
    • Manufacturing Processes
    • Manufacturing Technologies
    • Occupational Safety
    • Mold & Die Design
    • Solid Modeling
    • Welding Technology
    • Machine Elements
    • Mechanical Trade Drawing
    • Materials Science
    • Automotive & Vehicle Technologies
    • Robotics Technologies
    • Health Technologies
    • Defense & Aerospace Technologies
    • Descriptive Geometry
    • Technical Drawing
    • Software & Hardware Technologies
    • Innovative Manufacturing Methods
  • TEKNOLOJİ ve YAŞAM
    • OTOMOBİLLER ve TAŞIT
      • Vehicle & Engine Knowledge
      • Safe Driving
      • Sürüş Destek Sistemleri
    • Genel Kültür
      • Movies & TV Shows
      • Görsel ve Grafik Sanat
      • Books & Literature
      • Music
      • Sports
      • History
      • History of Technology
    • GÜNDELİK YAŞAM TEKNOLOJİLERİ
    • Hobbies & Entertainment
    • Internet Technologies
    • Health
    • Mobile Technologies
Makine Eğitimi
  • Machines & Manufacturing
    Machine Elements
    Hydraulics & Pneumatics
    Technical Drawing
    Computer-Aided Design & Manufacturing
    Basic Manufacturing Processes
    Manufacturing Processes
    Industry Technologies
    Other Technical Courses
    Motion & Power Transmission
    Simple Machines
    Chains & Sprockets
    Shafts & Journals
    Gears
    Cams
    Couplings
    Belts & Pulleys
    Springs
    Bearings
    Keys
    Fastening Joining
    Retaining Rings
    Screws, Bolts & Nuts
    Cotter Pins
    Flanges
    Welding
    Rivets
    Pins & Bolts
    Washers
    Calculators
    Gear Ratio Calculator
    Spring Constant Calculator
    Belt Pulley Ratio Calculator
    Other Machine Elements
    Slides & Linear Guides
    Brakes
    Flywheels
    Clamps
    Shock Absorbers
    Gaskets & O-Rings
    Seals & Sealing Elements
    Hydraulics
    Introduction to Hydraulics & Principles
    Hydraulic Systems & Applications
    Accumulators
    Filters
    Motors
    Pumps
    Valves
    Pneumatics
    Introduction to Pneumatics & Principles
    Pneumatic Systems & Applications
    Pneumatic Circuit Components
    Valves
    Cylinders
    Silencers
    Motors
    Compressors
    Dryers
    Conditioning Units
    Common Topics & Maintenance
    Hydraulic & Pneumatic Maintenance
    Study Notes, Exams & Tests
    Technical Drawing
    Introduction to Technical Drawing
    Geometric Drawings
    Perspective & Projection
    Orthographic Views
    Dimensioning
    Sectioning
    Assembly & Detail Drawings
    Tolerances
    Surface Finish Symbols
    Mechanical Engineering Drawing
    Screws, Bolts & Nuts
    Pulley Drawings
    Gear Drawings
    Shafts & Journals
    Bearing Drawings
    Pins & Bolts
    Spring Drawings
    Welds in Technical Drawing
    Washers
    Cotter Pins
    Technical Drawing Exercises
    Mechanical Drawing Exercises
    Gear Exercises
    View Extraction Exercises
    Pulley Exercises
    Pin & Bolt Exercises
    Threaded Fastening Exercises
    Descriptive Geometry
    Computer-Aided Drawing
    AutoCAD Drawing Lessons
    Solid Modeling & Animation
    Solid Model Drawing Files
    Solid Model Assembly Examples
    Solid Model Drawing Lessons
    3D CAD Software Reviews
    Solid Modeling Exercises
    CNC Programming
    CAM
    Measurement & Inspection
    Dial Indicators
    Calipers
    Gauges
    Micrometers
    Materials Science
    Steels
    Cast Iron
    Aluminum
    Plastics
    Material Testing & Hardness Measurement
    Occupational Safety
    Workshop Safety
    Safety When Working With Electricity
    Machine Safety Rules
    Hand Operations
    Filing
    Marking
    Cutting Operations
    Reaming
    Tapping
    Threading With a Die
    Drill Bit Sharpening
    Working With Machines
    Basic Turning Operations
    Basic Milling Operations
    Shaper Machine
    Machining
    Turning
    Milling
    Grinding
    Innovative Manufacturing Methods
    EDM (Electrical Discharge Machining)
    Laser Machining
    Waterjet Machining
    3D Printing
    3D Scanners
    Welding
    Rolling
    Casting
    Mold & Die Design
    Mechanical & Hydraulic Presses
    Blanking & Piercing Dies
    Bending Dies
    Drawing Dies
    Plastic Injection Molds
    Extrusion Dies
    Compound Dies
    Progressive Dies
    Blow Molds
    Spinning Dies
    Spray Molds
    Manufacturing of Machine Parts
    Automotive & Vehicle Technologies
    Motor Vehicle Manufacturing
    Raw Material Production
    History of Technology
    Health & Medical Technologies
    Defense & Aerospace
    Robotics Technologies
    Software & Hardware Technologies
    Mechanics - Strength of Materials
    Physics Topics
  • Technology & Life
    Hobbies & Entertainment
    Sports
    Music
    Vehicle & Engine Knowledge
    Vehicle Maintenance & Repair
    Safe Driving
    Driver Assistance Systems
    History
    Movies & TV Shows
    Books & Literature
    Computers & Internet
    Computer Tips
    Software Reviews
    Hardware & Peripherals
    Practical & Safe Internet Use
    Visual & Graphic Art
    Mobile Technologies
    Travel
    Science
    Health
    First Aid Knowledge
    Everyday Technologies
Makine Eğitimi
Home»Mold & Die Design»Maintenance of Plastic Injection Molds
29 August 2026Updated:3 September 2026

Maintenance of Plastic Injection Molds

Maintenance of Plastic Injection Molds

Depending on the workload, environment, and operating conditions of each injection mold and its parts, periodic maintenance schedules are set up in daily, weekly, monthly, 3-monthly, 6-monthly, and yearly intervals.

  • Mold Cleaning
  • Mold Polishing
    • Mold Polishing (Rubberized Abrasive) Stones
    • Mold Polishing Compounds (Diamond Paste)
    • Flex-Shaft Polishing Motor
  • Performing Injection Mold Maintenance
  • Maintenance and Repair Methods
    • 1- Breakdown Maintenance
    • 2- Preventive Maintenance
    • 3- Predictive Maintenance
    • 4- Proactive Maintenance
    • 5- Reliability-Centered Maintenance
  • Related Questions

Mold Cleaning

mold cleaning

1- The mold is opened. Once opened, the petroleum jelly inside is cleaned off with diesel fuel and cotton waste. The interior surface of the mold is checked for dents, nicks, or scratches. The tips of the ejector pins and core pins are checked for chips or dents. After the mold’s surfaces are cleaned with diesel fuel, they’re dried.

2- Polishing paste is applied and the mold is cleaned with a hand grinder and a polishing cloth. Care is taken during this process not to chip the sharp corners. It’s washed again with diesel fuel, cleaned with air, and dried.

3- A thin film layer of petroleum jelly is brushed onto the mold’s surface. The sprue is filled with petroleum jelly. The mold is closed and its outer surfaces (front and back) are cleaned with sandpaper.

4- The mold’s water system is checked for blockage by applying compressed air. Any missing water connection fittings are completed. If any section is found blocked, it’s cleaned by applying acid.

5- Any other missing bolts, slides, or safety retaining bars on the mold are completed and the mold is set aside ready for use.

Mold Polishing

Injection molds that run continuously develop, as a result, conditions that need repair, especially in the mold cavities that give shape to the product — such as wear, and loss of shine and smoothness. In this case, these areas need to undergo a repolishing process

Mold Polishing (Rubberized Abrasive) Stones

rubberized abrasive stones

Rubberized abrasive stones generally come in three colors: white (soft), red (medium-hard), and blue (hard). Depending on the area of use, they’re available with 2.34 mm, 3 mm, and 6 mm shafts (mandrels).

Hardness, friability, abrasiveness, and dimensions are determined according to need. Each stone has its own particular properties. Stones are available in grit sizes of 60, 120, 150, 180, 220, 320, 400, 600, and 800.

They’re manufactured in various shapes. As well as cylindrical or cone-shaped ones, there are also profiles like flat, triangular, square, and knife-edge shapes.

Mold Polishing Compounds (Diamond Paste)

These were developed for polishing press and injection molds, where quality and efficiency matter. Diamond pastes are obtained from a mixture of natural and industrial diamond. The unmatched cutting power of natural diamond is combined with the hardness and durability of industrial diamond.

They’re available in both water-based and oil-based formulas, and can be used with thinner and a special softening agent.

areas of use of diamond paste
Diamond paste colors and their areas of use

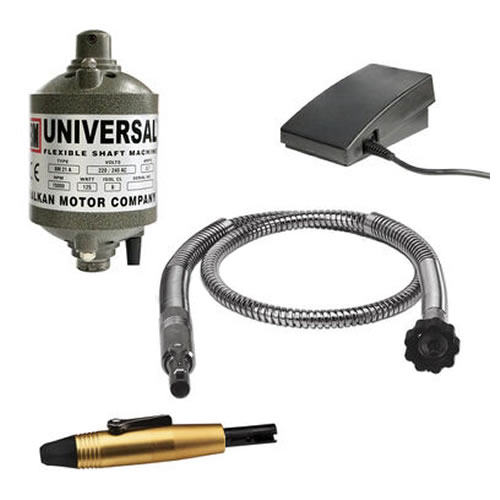
Flex-Shaft Polishing Motor

mold polishing flex-shaft motor

The flex-shaft motors used for mold polishing generally run at 15,000, 22,500, and 25,000 rpm.

Mold maintenance polishing is carried out in two stages. In the first stage, pre-polishing is done with rubberized abrasive stones and liquid diamond pastes. For this purpose, diamond pastes of various micron sizes, as shown above, are used.

In the second stage, the actual polishing is done using felt bobs and a flex-shaft motor. High-speed motors should be preferred here.

Preventing Surface Rust


Mold surfaces are protected with special oils after use to prevent moisture-related rust.

Cooling Channel Cleaning


Regularly cleaning the cooling channels inside the mold directly affects product quality and cycle time.

Periodic Maintenance Schedule


Injection molds should be scheduled for periodic maintenance based on the shot count specified by the manufacturer.

Performing Injection Mold Maintenance

For details about maintenance
SEE: Performing Injection Mold Maintenance
You can download the monthly maintenance card here.
You can download the 6-monthly maintenance card here.

Maintenance and Repair Methods

1- Breakdown Maintenance

Repairs are made once a failure occurs. Failures occurring at unexpected times leave no room for planning. There’s a high risk of repeated failures in the same or nearby areas. This is the highest-cost approach. The reason is the production loss experienced during the failure downtime.

2- Preventive Maintenance

This is periodic maintenance. It’s based on the probable frequency of failure. Failure-preventing maintenance work orders are periodically opened based on these intervals. The risk, and the reason for its high cost to the business, is keeping repair intervals short in order to stay ahead of failures.

3- Predictive Maintenance

This is a method of addressing developing conditions before a failure occurs, through planned repair activity, along with related issues, before the failure grows. With this approach, the unnecessary maintenance work carried out under preventive maintenance is no longer needed, and at the same time, unexpected failures can be identified in advance. The reduction in downtime results in significant savings in parts and labor costs.

4- Proactive Maintenance

Repair results are tracked using data recorded before and after maintenance and the analyses performed on it. Every repair performed is verified to confirm whether it actually achieved the correct result. In addition to predictive maintenance, in proactive maintenance, this criterion is checked before the equipment goes back into service after maintenance. If the maintenance isn’t of the desired quality, it’s corrected. As a result, the intervals between required maintenance grow longer, leading to less maintenance need over the course of the year.

5- Reliability-Centered Maintenance

This is a combination of preventive, predictive, and proactive maintenance methods. All developments are tracked from a single center, under one roof. Emergency work orders are opened within the same system.

Related Questions

Petroleum jelly and residue that build up on the mold’s surface can degrade the surface quality of the part in the next production run. Regular cleaning both extends the mold’s lifespan and preserves the consistency of the parts produced.

The water channels play a critical role in cooling the mold, which protects production speed and part quality. If the channels become blocked, cooling becomes inadequate, which can lead to part deformation or longer production times.

Related Posts

die side rails Side Rails and Their Mounting in Blanking Dies Washer Die Assembly and Detail Drawings Washer Die Assembly and Detail Drawings – Dwg pdf Kalıplarda Sıyırıcı Plâkaları ve Montajı Stripper Plates and Their Assembly Centering Pins in Dies Centering Pin Dimensions and Assembly in Dies Birleşik Kalıplar Compound Dies Kalıplarda Kullanılan Yaylar ve Kauçuklar Springs and Rubber Pads Used in Dies Stops and Side Gauges in Blanking Dies Stops and Side Gauges in Blanking Dies Parts of Eccentric Presses Parts of Eccentric Presses
Plastic Injection Molds
Share. Facebook Twitter WhatsApp Tumblr Email Telegram Copy Link

Leave A Reply Cancel Reply

How to Tell a Shock Absorber Has a Fault. Shock Absorber Fault Diagnosis
Traffic Regulatory Signs and Their Meanings. Restriction and Command Signs
  • Contact
  • Terms of Service
  • Privacy & Cookie Policy

Type above and press Enter to search. Press Esc to cancel.