Close Menu
  • MAKİNELER ve İMALAT
    • Tools & Equipment
    • Computer-Aided Drawing
    • CAD/CAM Education
    • CNC Machine Programming
    • Casting Technologies
    • Electrical & Electronics Technologies
    • Hydraulics & Pneumatics
    • Manufacturing Processes
    • Manufacturing Technologies
    • Occupational Safety
    • Mold & Die Design
    • Solid Modeling
    • Welding Technology
    • Machine Elements
    • Mechanical Trade Drawing
    • Materials Science
    • Automotive & Vehicle Technologies
    • Robotics Technologies
    • Health Technologies
    • Defense & Aerospace Technologies
    • Descriptive Geometry
    • Technical Drawing
    • Software & Hardware Technologies
    • Innovative Manufacturing Methods
  • TEKNOLOJİ ve YAŞAM
    • OTOMOBİLLER ve TAŞIT
      • Vehicle & Engine Knowledge
      • Safe Driving
      • Sürüş Destek Sistemleri
    • Genel Kültür
      • Movies & TV Shows
      • Görsel ve Grafik Sanat
      • Books & Literature
      • Music
      • Sports
      • History
      • History of Technology
    • GÜNDELİK YAŞAM TEKNOLOJİLERİ
    • Hobbies & Entertainment
    • Internet Technologies
    • Health
    • Mobile Technologies
Makine Eğitimi
  • Machines & Manufacturing
    Machine Elements
    Hydraulics & Pneumatics
    Technical Drawing
    Computer-Aided Design & Manufacturing
    Basic Manufacturing Processes
    Manufacturing Processes
    Industry Technologies
    Other Technical Courses
    Motion & Power Transmission
    Simple Machines
    Chains & Sprockets
    Shafts & Journals
    Gears
    Cams
    Couplings
    Belts & Pulleys
    Springs
    Bearings
    Keys
    Fastening Joining
    Retaining Rings
    Screws, Bolts & Nuts
    Cotter Pins
    Flanges
    Welding
    Rivets
    Pins & Bolts
    Washers
    Calculators
    Gear Ratio Calculator
    Spring Constant Calculator
    Belt Pulley Ratio Calculator
    Other Machine Elements
    Slides & Linear Guides
    Brakes
    Flywheels
    Clamps
    Shock Absorbers
    Gaskets & O-Rings
    Seals & Sealing Elements
    Hydraulics
    Introduction to Hydraulics & Principles
    Hydraulic Systems & Applications
    Accumulators
    Filters
    Motors
    Pumps
    Valves
    Pneumatics
    Introduction to Pneumatics & Principles
    Pneumatic Systems & Applications
    Pneumatic Circuit Components
    Valves
    Cylinders
    Silencers
    Motors
    Compressors
    Dryers
    Conditioning Units
    Common Topics & Maintenance
    Hydraulic & Pneumatic Maintenance
    Study Notes, Exams & Tests
    Technical Drawing
    Introduction to Technical Drawing
    Geometric Drawings
    Perspective & Projection
    Orthographic Views
    Dimensioning
    Sectioning
    Assembly & Detail Drawings
    Tolerances
    Surface Finish Symbols
    Mechanical Engineering Drawing
    Screws, Bolts & Nuts
    Pulley Drawings
    Gear Drawings
    Shafts & Journals
    Bearing Drawings
    Pins & Bolts
    Spring Drawings
    Welds in Technical Drawing
    Washers
    Cotter Pins
    Technical Drawing Exercises
    Mechanical Drawing Exercises
    Gear Exercises
    View Extraction Exercises
    Pulley Exercises
    Pin & Bolt Exercises
    Threaded Fastening Exercises
    Descriptive Geometry
    Computer-Aided Drawing
    AutoCAD Drawing Lessons
    Solid Modeling & Animation
    Solid Model Drawing Files
    Solid Model Assembly Examples
    Solid Model Drawing Lessons
    3D CAD Software Reviews
    Solid Modeling Exercises
    CNC Programming
    CAM
    Measurement & Inspection
    Dial Indicators
    Calipers
    Gauges
    Micrometers
    Materials Science
    Steels
    Cast Iron
    Aluminum
    Plastics
    Material Testing & Hardness Measurement
    Occupational Safety
    Workshop Safety
    Safety When Working With Electricity
    Machine Safety Rules
    Hand Operations
    Filing
    Marking
    Cutting Operations
    Reaming
    Tapping
    Threading With a Die
    Drill Bit Sharpening
    Working With Machines
    Basic Turning Operations
    Basic Milling Operations
    Shaper Machine
    Machining
    Turning
    Milling
    Grinding
    Innovative Manufacturing Methods
    EDM (Electrical Discharge Machining)
    Laser Machining
    Waterjet Machining
    3D Printing
    3D Scanners
    Welding
    Rolling
    Casting
    Mold & Die Design
    Mechanical & Hydraulic Presses
    Blanking & Piercing Dies
    Bending Dies
    Drawing Dies
    Plastic Injection Molds
    Extrusion Dies
    Compound Dies
    Progressive Dies
    Blow Molds
    Spinning Dies
    Spray Molds
    Manufacturing of Machine Parts
    Automotive & Vehicle Technologies
    Motor Vehicle Manufacturing
    Raw Material Production
    History of Technology
    Health & Medical Technologies
    Defense & Aerospace
    Robotics Technologies
    Software & Hardware Technologies
    Mechanics - Strength of Materials
    Physics Topics
  • Technology & Life
    Hobbies & Entertainment
    Sports
    Music
    Vehicle & Engine Knowledge
    Vehicle Maintenance & Repair
    Safe Driving
    Driver Assistance Systems
    History
    Movies & TV Shows
    Books & Literature
    Computers & Internet
    Computer Tips
    Software Reviews
    Hardware & Peripherals
    Practical & Safe Internet Use
    Visual & Graphic Art
    Mobile Technologies
    Travel
    Science
    Health
    First Aid Knowledge
    Everyday Technologies
Makine Eğitimi
Home»Manufacturing Processes»How to Tap a Hole? How Is Tapping Done?
29 August 2026

How to Tap a Hole? How Is Tapping Done?

How Is Tapping Done?

On our machine training pages, in the Manufacturing Processes category, we’re covering the topic of tapping. We’ll cover how tapping is done, and the steps of the tapping process.

  • Tapping
    • Hand Tapping
    • How to Tap a Hole
      • How to Tap a Hole – Video
    • Machine Tapping
    • Drill Diameters for Tapping

Tapping

Internal threads can be cut with a tap either by hand or on a machine. Depending on the quantity of parts to be produced and the desired precision and surface quality, various manufacturing methods can be used.

To cut internal threads, the tap-drill hole needs to be drilled first. For a metric ISO thread, the diameter of the tap-drill hole (drill diameter) corresponds to the value obtained by subtracting the thread pitch from the thread’s major diameter.

Hand Tapping

1- To tap a hole, the hole to be tapped first needs to be drilled to the correct diameter.

Related Post Kılavuzlar için Matkap Çapı Tablosu

2- The mouth of the hole to be tapped needs to be chamfered with a countersink drill.
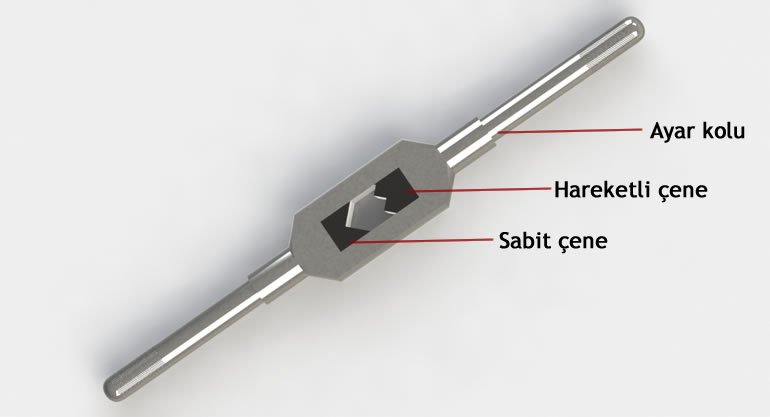
tap wrench

3- The appropriate tap set and tap wrench are selected for the job.

4- From the tap set, the tap to be inserted into the hole first is chosen (the taper tap).

identifying tap number 1 in a tap set

A 3-piece hand tap set consists of a taper tap, a plug tap, and a bottoming (finishing) tap. To obtain a clean thread cut to the correct size, and to avoid straining any single tap with too much material removal, the cutting work is split across the set’s 3 taps.

Taps have marking lines to show the order in which they should be used. The taps are used in sequence according to the number of lines. On some sets, the 3rd tap has no line at all. If none of them have a line, look at the teeth and the lead-in chamfer of the taps in the set. The one with the most tapered tip and the least-defined teeth is the first. The others follow as the 2nd and 3rd accordingly.

how to tap a hole

5- The tap is mounted onto the tap wrench.

How to Tap a Hole

You need to make sure the tap is aligned with the hole’s axis. The tap is placed into the hole perpendicular to the part’s surface. A few drops of oil are applied at the mouth of the hole to make cutting easier. Then, while pressing down lightly on the tap wrench, it’s turned clockwise at the same time.
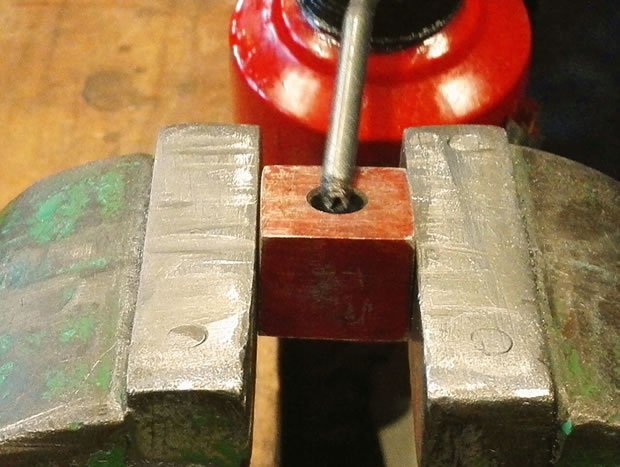
hand tapping

Lubricating the inside of the hole while tapping makes cutting easier.
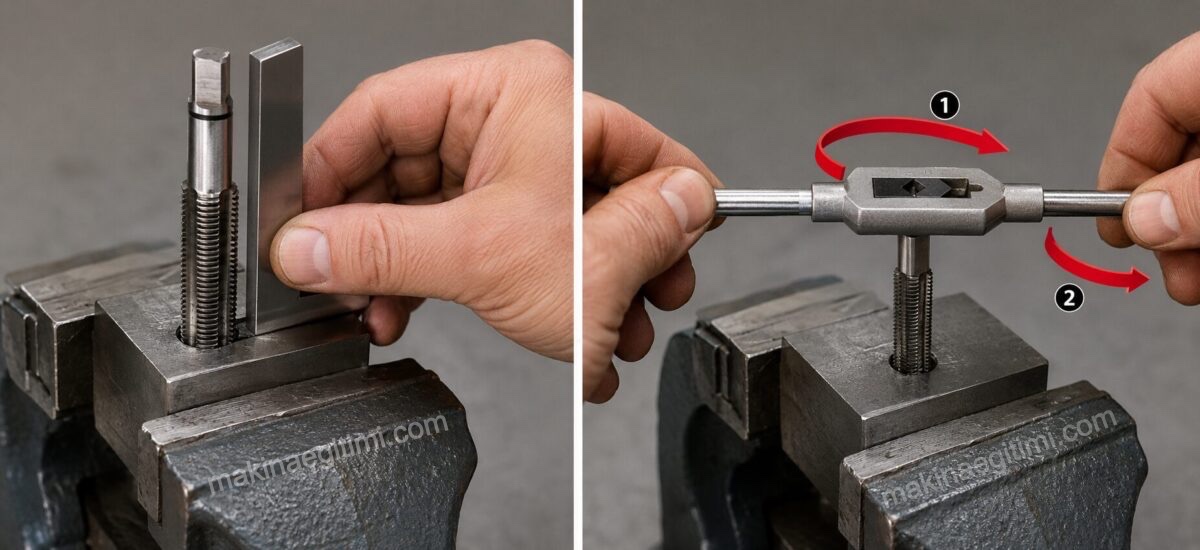
tapping steps

Starting the tap correctly is important during tapping. To start it, make sure the tap is perpendicular to the part’s surface, and turn it clockwise using the tap wrench while pressing down lightly.

If, when you let go of the tap wrench, the tap stays gripped in the part and doesn’t fall out, this means the starting step was successful.

how to do tapping

6- Once the tap is started, it’s turned half a turn clockwise (cutting) and then a quarter turn counterclockwise (breaking off the chip being cut from the part).

This is repeated until the end of the hole is reached.
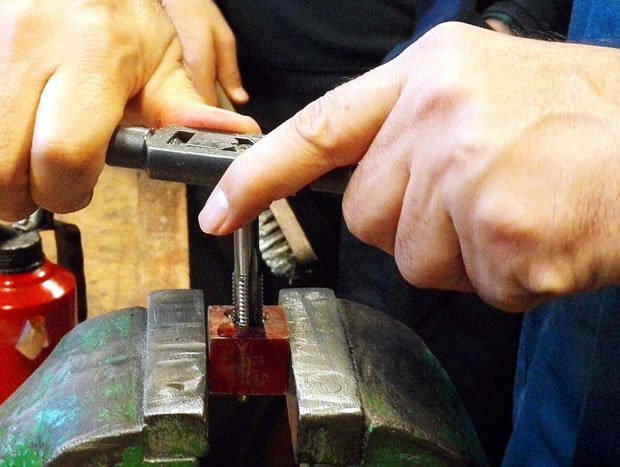
cutting threads with a tap

The tap needs to start and advance exactly along the hole’s axis. Thanks to the reversing motion, repeated roughly every quarter turn around the tap’s own axis, the chips are broken off and fresh cutting oil reaches the cutting edges again.

How tapping is done

7- The same process is repeated with taps number 2 and 3. This continues until the tap can turn and advance easily inside the part with just a very light finger force.

How to Tap a Hole – Video

You can watch how tapping is done in the video prepared on how to tap a hole.

Video about tapping

Machine Tapping

When tapping on a lathe, drill press, or thread-cutting machine, the threads are cut exactly along the axis of the threaded hole. Thanks to appropriately high cutting speeds, machine tapping significantly shortens the time compared to hand tapping.

machine tap
Machine tap

On a tapping attachment mounted to a drill press, the allowable torque can be adjusted depending on the size of the thread and the material. Once the set thread depth is reached, the attachment automatically switches to a reverse motion at an increased speed.

Drill Diameters for Tapping

The table below gives the tap-drill hole diameters for tapping. The tap-drill holes need to be drilled to the permitted size. This makes tapping easier and prevents the tap from breaking.

hole diameters/drill diameters for tapping

Hole diameter for M3 is 2.5   / drill diameter for M3 is 2.5
Hole diameter for M4 is 3.5   / drill diameter for M4 is 3.5
Hole diameter for M5 is 4.2   / drill diameter for M5 is 4 or 4.5
Hole diameter for M6 is 5.0    / drill diameter for M6 is 5
Hole diameter for M8 is 6.8   / drill diameter for M8 is 7
Hole diameter for M10 is 8.5 / drill diameter for M10 is 8.5
Hole diameter for M12 is 10.2 / drill diameter for M12 is 10 or 10.5
Hole diameter for M16 is 14.0 / drill diameter for M16 is 14
Hole diameter for M20 is 17.5 / drill diameter for M20 is 17.5
Hole diameter for M24 is 21.0 / drill diameter for M24 is 21

Related Posts

Safety Rules for Working on a Lathe Safety Rules for Working on a Lathe How Are End Mills Mounted How Are End Mills Mounted Turning with the Aid of a Mandrel Turning with the Aid of a Mandrel Üniversal Torna Ayna Ayaklarının Değiştirilmesi Changing the Jaws on a Universal Lathe Chuck mm to Inch – Inch to mm Conversion Drill presses and their types, title image Drill Presses and Their Types Micrometer simulator interactive tool Micrometer Simulator Types of Gauges Lesson Information About Types of Gauges
Tapping Threaded Fasteners
Share. Facebook Twitter WhatsApp Tumblr Email Telegram Copy Link

Leave A Reply Cancel Reply

The Battle of Gallipoli: How One Front Changed a Nation’s Fate
Robotic Welding Applications on the Automotive Assembly Line
  • Contact
  • Terms of Service
  • Privacy & Cookie Policy

Type above and press Enter to search. Press Esc to cancel.