
Close Menu
  • MAKİNELER ve İMALAT
    • Tools & Equipment
    • Computer-Aided Drawing
    • CAD/CAM Education
    • CNC Machine Programming
    • Casting Technologies
    • Electrical & Electronics Technologies
    • Hydraulics & Pneumatics
    • Manufacturing Processes
    • Manufacturing Technologies
    • Occupational Safety
    • Mold & Die Design
    • Solid Modeling
    • Welding Technology
    • Machine Elements
    • Mechanical Trade Drawing
    • Materials Science
    • Automotive & Vehicle Technologies
    • Robotics Technologies
    • Health Technologies
    • Defense & Aerospace Technologies
    • Descriptive Geometry
    • Technical Drawing
    • Software & Hardware Technologies
    • Innovative Manufacturing Methods
  • TEKNOLOJİ ve YAŞAM
    • OTOMOBİLLER ve TAŞIT
      • Vehicle & Engine Knowledge
      • Safe Driving
      • Sürüş Destek Sistemleri
    • Genel Kültür
      • Movies & TV Shows
      • Görsel ve Grafik Sanat
      • Books & Literature
      • Music
      • Sports
      • History
      • History of Technology
    • GÜNDELİK YAŞAM TEKNOLOJİLERİ
    • Hobbies & Entertainment
    • Internet Technologies
    • Health
    • Mobile Technologies
Makine Eğitimi
  • Machines & Manufacturing
    Machine Elements
    Hydraulics & Pneumatics
    Technical Drawing
    Computer-Aided Design & Manufacturing
    Basic Manufacturing Processes
    Manufacturing Processes
    Industry Technologies
    Other Technical Courses
    Motion & Power Transmission
    Simple Machines
    Chains & Sprockets
    Shafts & Journals
    Gears
    Cams
    Couplings
    Belts & Pulleys
    Springs
    Bearings
    Keys
    Fastening Joining
    Retaining Rings
    Screws, Bolts & Nuts
    Cotter Pins
    Flanges
    Welding
    Rivets
    Pins & Bolts
    Washers
    Calculators
    Gear Ratio Calculator
    Spring Constant Calculator
    Belt Pulley Ratio Calculator
    Other Machine Elements
    Slides & Linear Guides
    Brakes
    Flywheels
    Clamps
    Shock Absorbers
    Gaskets & O-Rings
    Seals & Sealing Elements
    Hydraulics
    Introduction to Hydraulics & Principles
    Hydraulic Systems & Applications
    Accumulators
    Filters
    Motors
    Pumps
    Valves
    Pneumatics
    Introduction to Pneumatics & Principles
    Pneumatic Systems & Applications
    Pneumatic Circuit Components
    Valves
    Cylinders
    Silencers
    Motors
    Compressors
    Dryers
    Conditioning Units
    Common Topics & Maintenance
    Hydraulic & Pneumatic Maintenance
    Study Notes, Exams & Tests
    Technical Drawing
    Introduction to Technical Drawing
    Geometric Drawings
    Perspective & Projection
    Orthographic Views
    Dimensioning
    Sectioning
    Assembly & Detail Drawings
    Tolerances
    Surface Finish Symbols
    Mechanical Engineering Drawing
    Screws, Bolts & Nuts
    Pulley Drawings
    Gear Drawings
    Shafts & Journals
    Bearing Drawings
    Pins & Bolts
    Spring Drawings
    Welds in Technical Drawing
    Washers
    Cotter Pins
    Technical Drawing Exercises
    Mechanical Drawing Exercises
    Gear Exercises
    View Extraction Exercises
    Pulley Exercises
    Pin & Bolt Exercises
    Threaded Fastening Exercises
    Descriptive Geometry
    Computer-Aided Drawing
    AutoCAD Drawing Lessons
    Solid Modeling & Animation
    Solid Model Drawing Files
    Solid Model Assembly Examples
    Solid Model Drawing Lessons
    3D CAD Software Reviews
    Solid Modeling Exercises
    CNC Programming
    CAM
    Measurement & Inspection
    Dial Indicators
    Calipers
    Gauges
    Micrometers
    Materials Science
    Steels
    Cast Iron
    Aluminum
    Plastics
    Material Testing & Hardness Measurement
    Occupational Safety
    Workshop Safety
    Safety When Working With Electricity
    Machine Safety Rules
    Hand Operations
    Filing
    Marking
    Cutting Operations
    Reaming
    Tapping
    Threading With a Die
    Drill Bit Sharpening
    Working With Machines
    Basic Turning Operations
    Basic Milling Operations
    Shaper Machine
    Machining
    Turning
    Milling
    Grinding
    Innovative Manufacturing Methods
    EDM (Electrical Discharge Machining)
    Laser Machining
    Waterjet Machining
    3D Printing
    3D Scanners
    Welding
    Rolling
    Casting
    Mold & Die Design
    Mechanical & Hydraulic Presses
    Blanking & Piercing Dies
    Bending Dies
    Drawing Dies
    Plastic Injection Molds
    Extrusion Dies
    Compound Dies
    Progressive Dies
    Blow Molds
    Spinning Dies
    Spray Molds
    Manufacturing of Machine Parts
    Automotive & Vehicle Technologies
    Motor Vehicle Manufacturing
    Raw Material Production
    History of Technology
    Health & Medical Technologies
    Defense & Aerospace
    Robotics Technologies
    Software & Hardware Technologies
    Mechanics - Strength of Materials
    Physics Topics
  • Technology & Life
    Hobbies & Entertainment
    Sports
    Music
    Vehicle & Engine Knowledge
    Vehicle Maintenance & Repair
    Safe Driving
    Driver Assistance Systems
    History
    Movies & TV Shows
    Books & Literature
    Computers & Internet
    Computer Tips
    Software Reviews
    Hardware & Peripherals
    Practical & Safe Internet Use
    Visual & Graphic Art
    Mobile Technologies
    Travel
    Science
    Health
    First Aid Knowledge
    Everyday Technologies
Makine Eğitimi
Home»CNC Machine Programming»Powering On a Fanuc CNC Lathe. How Is a CNC Lathe Powered On
29 August 2026

Powering On a Fanuc CNC Lathe. How Is a CNC Lathe Powered On

How Is a Fanuc CNC Lathe Powered On

A video walkthrough of powering on a Fanuc-controlled CNC lathe. The goal is to create an ideal resource for anyone who wants to learn how a CNC lathe is powered on. Made by technical teacher Ahmet Kaya, and supported with step-by-step animations and images.

Illustrated Walkthrough of Powering On a CNC Lathe

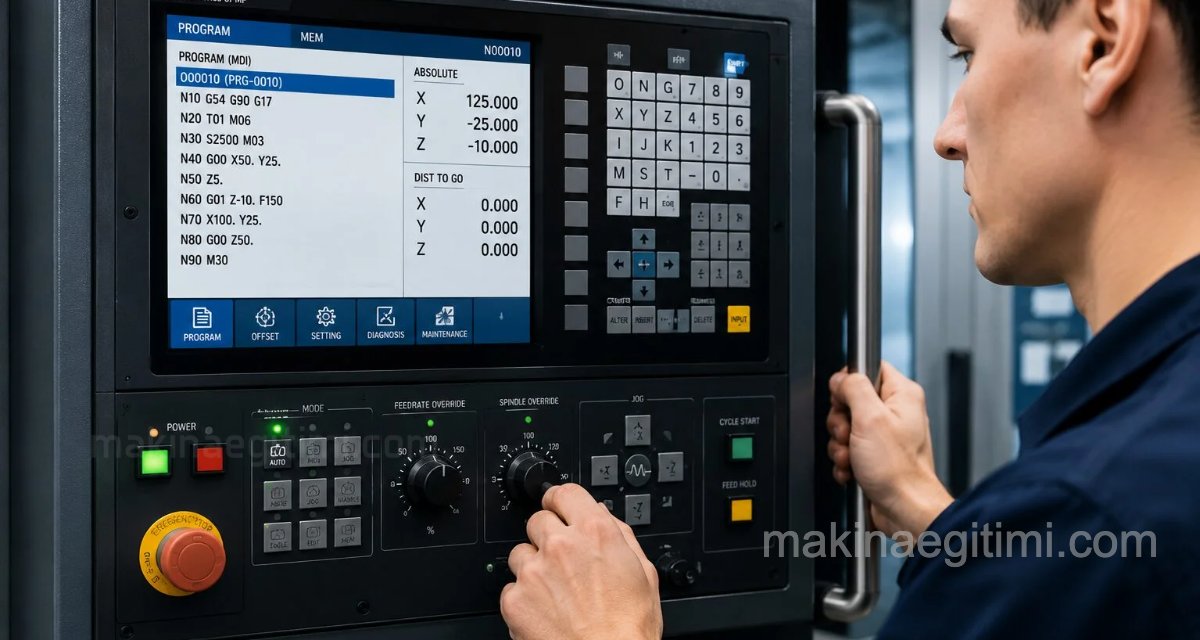
cnc machine control panel

After pressing the power on button, the CNC machine, just like a computer booting up, starts processing the commands stored in its memory, and uses the CRT screen to inform you, guide you, and give warnings about what’s happening whenever needed.

fanuc cnc lathe control panel

While the CNC machine is powering on, you keep an eye on the CRT screen to check whether what’s happening is normal or whether something unusual is occurring.

fanuc cnc crt screen reset

If everything is normal when a Fanuc CNC lathe powers on, this will be the first message you see on the CRT screen: PRESS RESET KEY. In other words, press the RESET key.

fanuc cnc lathe crt screen and keys

Right next to the CRT screen there’s a keypad, similar to a computer keyboard, for entering commands. The location of the RESET key is shown above.

steps for powering on a cnc lathe

As the next step in powering on the CNC lathe, we encounter the HYDSTART warning on the CRT screen. We need to press the HYDSTART key to start up the hydraulic system. The location of the HYDSTART button on the CNC control panel is shown above.

illustrated: how is a fanuc cnc lathe powered on
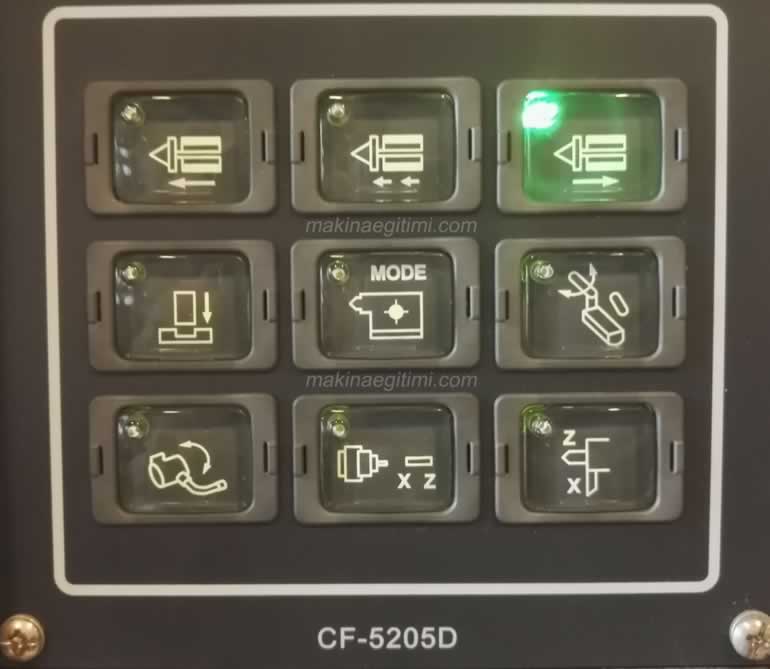
fanuc cnc tailstock retract key

In the next step of powering on the CNC lathe, we’ll press the tailstock retract key. The location of the tailstock retract key on the control panel is shown above.

fanuc cnc panel status
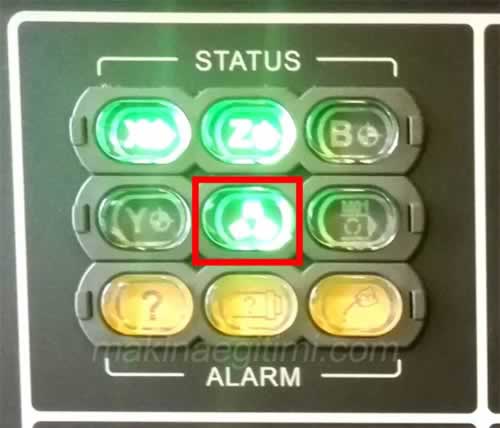
fanuc cnc status chuck

In the next step, we press the pedal to supply hydraulic power to the lathe chuck. We’ll see the chuck light come on in the control panel’s status section.

fanuc cnc lathe mode select switch

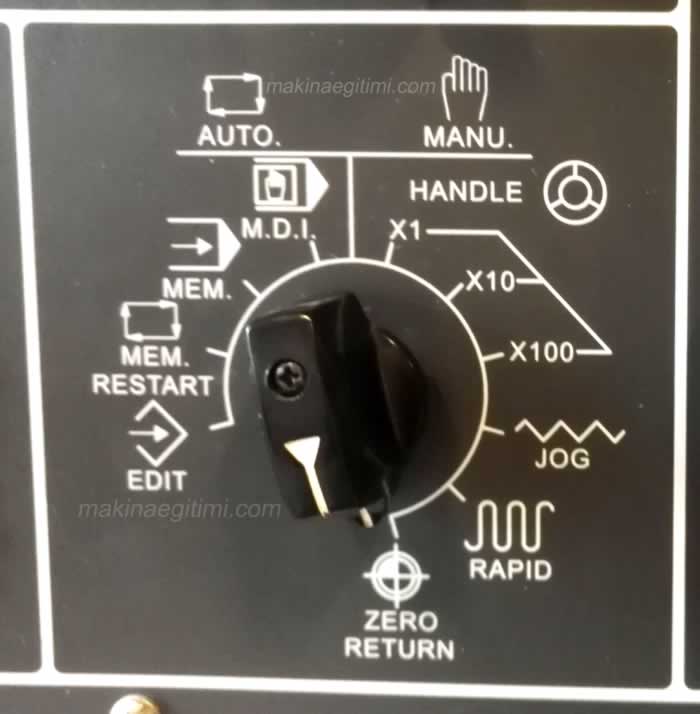
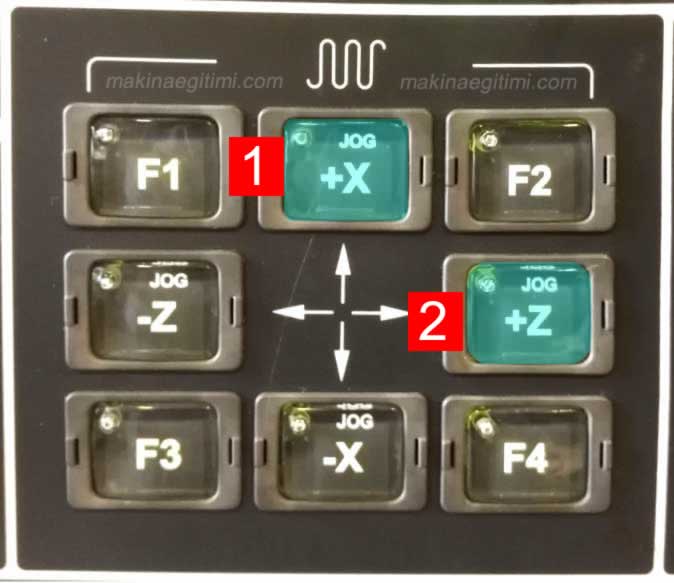
In the next step, we’ll send the tools on the turret to the reference point. To do this, we first turn the mode select switch’s dial to ZERO RETURN.

illustrated walkthrough of powering on a fanuc cnc
powering on a fanuc cnc lathe

Then we press the +X and +Z keys, in that order, in the area shown above. Following this order matters, in case the turret might hit something.

After these steps, we’ve finished powering on the CNC lathe, and the machine is ready to run.

Reference Point (G54)


When a CNC lathe powers on, the workpiece coordinate system is usually defined by one of the G54–G59 offset registers.

Zero Return


After power-on, every axis must perform a zero return to find the machine’s home position.

Emergency Stop Check


One of the first things to check when powering on the machine is that the emergency stop button and safety doors are working correctly.

Related Questions

This warning shows that the machine’s hydraulic system hasn’t been started yet. Since a lathe runs many mechanisms (chuck, tailstock, etc.) on hydraulic pressure, this system must be brought online by pressing the HYDSTART key.

RESET clears any leftover warnings or alarm states stored in the machine’s memory and brings the system to a known, safe starting state. If this step is skipped, the machine could power on carrying over a state from the previous session.


Related Posts
Mechanical Clamping Elements on Machine Tools Mechanical Clamping Elements on Machine Tools Dünyanın en iyi kesici takımları videosu Video: The World’s Best Cutting Tools Cnc Freze Atölyesi çalışma talimatı CNC Milling Workshop Operating Instructions CNC Longitudinal Turning Cycle G90 - G71 - G70 CNC Longitudinal Turning Cycle – G90 – G71 – G70 CNC Lathe Programming Examples CNC Lathe Programming Examples What the Keys on the CNC Milling Control Panel Mean What the Keys on the CNC Milling Control Panel Mean G75 CNC grooving cycle diagram G75 CNC Grooving Cycle Code Explained CNC Milling Programming Examples CNC Milling Programming Examples
Share. Facebook Twitter WhatsApp Tumblr Email Telegram Copy Link

Leave A Reply Cancel Reply

Genghis Khan: From an Abandoned Child to History’s Greatest Emperor
Car Cranks But Won’t Start: What Could Be the Cause?
  • Contact
  • Terms of Service
  • Privacy & Cookie Policy

Type above and press Enter to search. Press Esc to cancel.