Close Menu
  • MAKİNELER ve İMALAT
    • Tools & Equipment
    • Computer-Aided Drawing
    • CAD/CAM Education
    • CNC Machine Programming
    • Casting Technologies
    • Electrical & Electronics Technologies
    • Hydraulics & Pneumatics
    • Manufacturing Processes
    • Manufacturing Technologies
    • Occupational Safety
    • Mold & Die Design
    • Solid Modeling
    • Welding Technology
    • Machine Elements
    • Mechanical Trade Drawing
    • Materials Science
    • Automotive & Vehicle Technologies
    • Robotics Technologies
    • Health Technologies
    • Defense & Aerospace Technologies
    • Descriptive Geometry
    • Technical Drawing
    • Software & Hardware Technologies
    • Innovative Manufacturing Methods
  • TEKNOLOJİ ve YAŞAM
    • OTOMOBİLLER ve TAŞIT
      • Vehicle & Engine Knowledge
      • Safe Driving
      • Sürüş Destek Sistemleri
    • Genel Kültür
      • Movies & TV Shows
      • Görsel ve Grafik Sanat
      • Books & Literature
      • Music
      • Sports
      • History
      • History of Technology
    • GÜNDELİK YAŞAM TEKNOLOJİLERİ
    • Hobbies & Entertainment
    • Internet Technologies
    • Health
    • Mobile Technologies
Makine Eğitimi
  • Machines & Manufacturing
    Machine Elements
    Hydraulics & Pneumatics
    Technical Drawing
    Computer-Aided Design & Manufacturing
    Basic Manufacturing Processes
    Manufacturing Processes
    Industry Technologies
    Other Technical Courses
    Motion & Power Transmission
    Simple Machines
    Chains & Sprockets
    Shafts & Journals
    Gears
    Cams
    Couplings
    Belts & Pulleys
    Springs
    Bearings
    Keys
    Fastening Joining
    Retaining Rings
    Screws, Bolts & Nuts
    Cotter Pins
    Flanges
    Welding
    Rivets
    Pins & Bolts
    Washers
    Calculators
    Gear Ratio Calculator
    Spring Constant Calculator
    Belt Pulley Ratio Calculator
    Other Machine Elements
    Slides & Linear Guides
    Brakes
    Flywheels
    Clamps
    Shock Absorbers
    Gaskets & O-Rings
    Seals & Sealing Elements
    Hydraulics
    Introduction to Hydraulics & Principles
    Hydraulic Systems & Applications
    Accumulators
    Filters
    Motors
    Pumps
    Valves
    Pneumatics
    Introduction to Pneumatics & Principles
    Pneumatic Systems & Applications
    Pneumatic Circuit Components
    Valves
    Cylinders
    Silencers
    Motors
    Compressors
    Dryers
    Conditioning Units
    Common Topics & Maintenance
    Hydraulic & Pneumatic Maintenance
    Study Notes, Exams & Tests
    Technical Drawing
    Introduction to Technical Drawing
    Geometric Drawings
    Perspective & Projection
    Orthographic Views
    Dimensioning
    Sectioning
    Assembly & Detail Drawings
    Tolerances
    Surface Finish Symbols
    Mechanical Engineering Drawing
    Screws, Bolts & Nuts
    Pulley Drawings
    Gear Drawings
    Shafts & Journals
    Bearing Drawings
    Pins & Bolts
    Spring Drawings
    Welds in Technical Drawing
    Washers
    Cotter Pins
    Technical Drawing Exercises
    Mechanical Drawing Exercises
    Gear Exercises
    View Extraction Exercises
    Pulley Exercises
    Pin & Bolt Exercises
    Threaded Fastening Exercises
    Descriptive Geometry
    Computer-Aided Drawing
    AutoCAD Drawing Lessons
    Solid Modeling & Animation
    Solid Model Drawing Files
    Solid Model Assembly Examples
    Solid Model Drawing Lessons
    3D CAD Software Reviews
    Solid Modeling Exercises
    CNC Programming
    CAM
    Measurement & Inspection
    Dial Indicators
    Calipers
    Gauges
    Micrometers
    Materials Science
    Steels
    Cast Iron
    Aluminum
    Plastics
    Material Testing & Hardness Measurement
    Occupational Safety
    Workshop Safety
    Safety When Working With Electricity
    Machine Safety Rules
    Hand Operations
    Filing
    Marking
    Cutting Operations
    Reaming
    Tapping
    Threading With a Die
    Drill Bit Sharpening
    Working With Machines
    Basic Turning Operations
    Basic Milling Operations
    Shaper Machine
    Machining
    Turning
    Milling
    Grinding
    Innovative Manufacturing Methods
    EDM (Electrical Discharge Machining)
    Laser Machining
    Waterjet Machining
    3D Printing
    3D Scanners
    Welding
    Rolling
    Casting
    Mold & Die Design
    Mechanical & Hydraulic Presses
    Blanking & Piercing Dies
    Bending Dies
    Drawing Dies
    Plastic Injection Molds
    Extrusion Dies
    Compound Dies
    Progressive Dies
    Blow Molds
    Spinning Dies
    Spray Molds
    Manufacturing of Machine Parts
    Automotive & Vehicle Technologies
    Motor Vehicle Manufacturing
    Raw Material Production
    History of Technology
    Health & Medical Technologies
    Defense & Aerospace
    Robotics Technologies
    Software & Hardware Technologies
    Mechanics - Strength of Materials
    Physics Topics
  • Technology & Life
    Hobbies & Entertainment
    Sports
    Music
    Vehicle & Engine Knowledge
    Vehicle Maintenance & Repair
    Safe Driving
    Driver Assistance Systems
    History
    Movies & TV Shows
    Books & Literature
    Computers & Internet
    Computer Tips
    Software Reviews
    Hardware & Peripherals
    Practical & Safe Internet Use
    Visual & Graphic Art
    Mobile Technologies
    Travel
    Science
    Health
    First Aid Knowledge
    Everyday Technologies
Makine Eğitimi
Home»Mold & Die Design»Centering Pin Dimensions and Assembly in Dies
30 August 2026

Centering Pin Dimensions and Assembly in Dies

Centering Pins in Dies

In this article you can review the pins used for centering in die design, their dimensions, and how they are used in assembly.

  • Standard Centering Pins
  • Use of Centering Pins in Assembly
    • Use in Assembling Two Plates
      • For Through Holes:
      • For Blind, Side-Blind, and Relieved-Tip Holes
    • Use of Centering Pins in Assembling Three or More Plates
    • Assembly of Hardened Plates

Standard Centering Pins

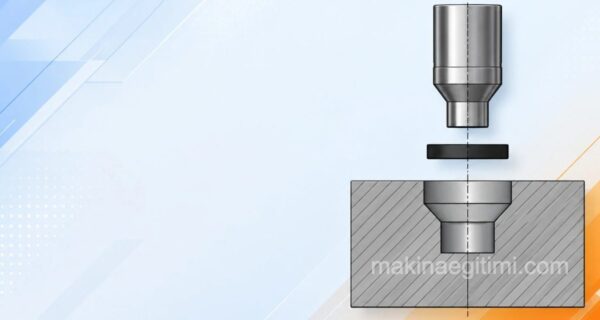
One end of a centering pin is tapered at 5-12 degrees.

As seen above, standard centering pins are tapered at one end between 5° and 12°. However, for ease of drawing they are shown as in the image below.

Representation of the centering pin
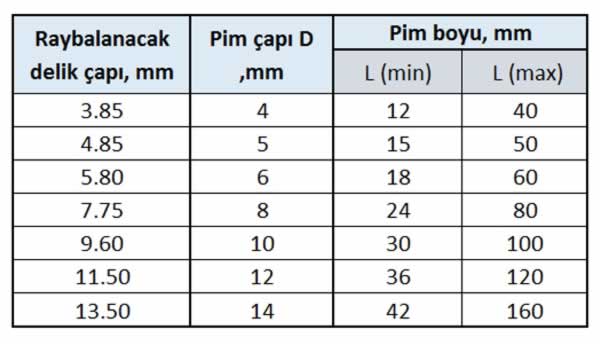
centering pin reamed hole diameter dimensions TS 69/15
Table 1: Cylindrical centering pin dimensions and reamed hole diameter

The centering pin dimensions used in small and medium-tonnage dies according to TS 69/15 are given in the table above.

Use of Centering Pins in Assembly

Use in Assembling Two Plates

For Through Holes:

assembly of two plates with a centering pin

The assembly of two plates drilled all the way through using centering pins is shown in the figure above.

Cylindrical head, hex socket standard metric bolt (TS 1020/10)
Table 2: Cylindrical head, hex socket standard metric bolt (TS 1020/10)

The dimensions of centering pins used for assembling plates thinner than 50 mm are selected from the table above. However, the pin length L(min) cannot be less than 3.D.

For Blind, Side-Blind, and Relieved-Tip Holes

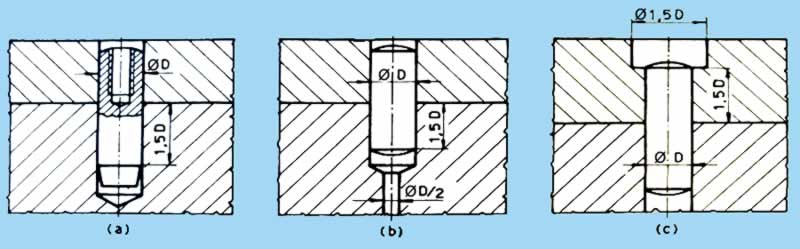
If one of the plates to be assembled is too thick or has a closed body behind it, a blind hole is drilled and a threaded pull-out type centering pin is used (figure a below).
centering pin in blind holes in dies

If the back of the plate to be assembled is open but a through pin hole is not desired, a side-blind hole is drilled into the plate or body. To make removing the pin easier, an extension of the pin hole is drilled at a diameter of D/2 (figure b above).

When the plates to be assembled are thicker than 50 mm, the tip of the centering pin hole is relieved to a diameter of 1.5D, avoiding the use of overly long pins (figure c above). In this type of assembly operation, the relieved end of the pin hole is closed with a soft material, for example hard rubber.

Use of Centering Pins in Assembling Three or More Plates

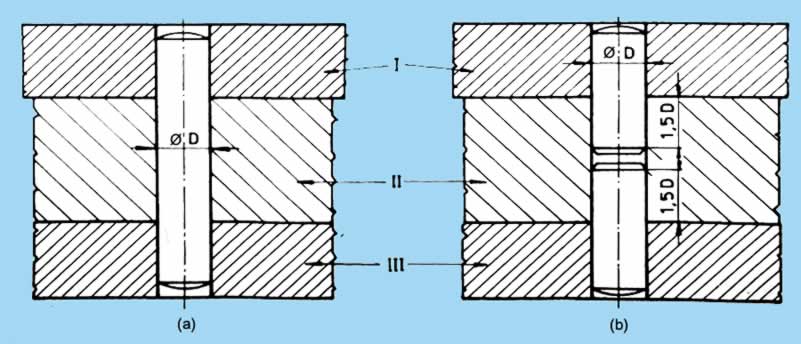
Single or stepped pins are used to position and assemble a large number of plates with centering pins. Because of the large friction surface during assembly with a single pin, the pin may deform or become damaged.

In such cases, material consumption and labor increase. When a stepped pin is used, if one of the pins becomes damaged, making a new one is easy and material consumption is low.
centering pin assembly in multiple plates

If the thickness of the plates to be assembled is too great, for example exceeding standard pin length, a stepped pin is preferred for the assembly. The figure above shows the use of single and stepped pins when assembling a large number of plates.

Assembly of Hardened Plates

When assembling hardened plates, previously drilled and reamed holes change dimension after heat treatment. In these and similar operations, the pin holes of heat-treated plates are ground whenever possible (figure a below).

pin assembly in hardened plates

If the centering pin hole diameter is too small to be ground, the pin hole in the plates to be assembled is drilled, before heat treatment, at twice the size of the actual pin diameter, and a centering pin with a protective bushing is used for assembling these plates (figure b above).

If one of the plates to be assembled will undergo heat treatment, that plate’s pin hole is drilled larger than the actual pin hole diameter before heat treatment. Thus, a centering pin with a half protective bushing is used to assemble two plates, one hardened and the other soft (not hardened).

Related Posts
impact extrusion die, backward and forward extrusion Impact Extrusion Dies Parts of Eccentric Presses Parts of Eccentric Presses Bending Force Calculation for Bending Dies Bending Force Calculation for Bending Dies Çekme kalıplarında Buruşma Önleme Preventing Wrinkling and Determining Draw Stages in Drawing Dies Plastik enjeksiyon kalıpları Enjeksiyon Sistemi Plastic Injection Molds: Injection System bend radius in bending dies Theory of Deformation in Bent Parts in Bending Dies Drawer Rail Piercing Die Assembly and Detail Drawings Drawer Rail Piercing Die Assembly and Detail Drawings drawing die calculation formulas Drawing Die Calculation Table
Blanking & Piercing Dies Pins & Bolts
Share. Facebook Twitter WhatsApp Tumblr Email Telegram Copy Link

Leave A Reply Cancel Reply

When Should the Timing Belt Be Replaced
What Is a Drum Brake System, How Does It Work
  • Contact
  • Terms of Service
  • Privacy & Cookie Policy

Type above and press Enter to search. Press Esc to cancel.