Close Menu
  • MAKİNELER ve İMALAT
    • Tools & Equipment
    • Computer-Aided Drawing
    • CAD/CAM Education
    • CNC Machine Programming
    • Casting Technologies
    • Electrical & Electronics Technologies
    • Hydraulics & Pneumatics
    • Manufacturing Processes
    • Manufacturing Technologies
    • Occupational Safety
    • Mold & Die Design
    • Solid Modeling
    • Welding Technology
    • Machine Elements
    • Mechanical Trade Drawing
    • Materials Science
    • Automotive & Vehicle Technologies
    • Robotics Technologies
    • Health Technologies
    • Defense & Aerospace Technologies
    • Descriptive Geometry
    • Technical Drawing
    • Software & Hardware Technologies
    • Innovative Manufacturing Methods
  • TEKNOLOJİ ve YAŞAM
    • OTOMOBİLLER ve TAŞIT
      • Vehicle & Engine Knowledge
      • Safe Driving
      • Sürüş Destek Sistemleri
    • Genel Kültür
      • Movies & TV Shows
      • Görsel ve Grafik Sanat
      • Books & Literature
      • Music
      • Sports
      • History
      • History of Technology
    • GÜNDELİK YAŞAM TEKNOLOJİLERİ
    • Hobbies & Entertainment
    • Internet Technologies
    • Health
    • Mobile Technologies
Makine Eğitimi
  • Machines & Manufacturing
    Machine Elements
    Hydraulics & Pneumatics
    Technical Drawing
    Computer-Aided Design & Manufacturing
    Basic Manufacturing Processes
    Manufacturing Processes
    Industry Technologies
    Other Technical Courses
    Motion & Power Transmission
    Simple Machines
    Chains & Sprockets
    Shafts & Journals
    Gears
    Cams
    Couplings
    Belts & Pulleys
    Springs
    Bearings
    Keys
    Fastening Joining
    Retaining Rings
    Screws, Bolts & Nuts
    Cotter Pins
    Flanges
    Welding
    Rivets
    Pins & Bolts
    Washers
    Calculators
    Gear Ratio Calculator
    Spring Constant Calculator
    Belt Pulley Ratio Calculator
    Other Machine Elements
    Slides & Linear Guides
    Brakes
    Flywheels
    Clamps
    Shock Absorbers
    Gaskets & O-Rings
    Seals & Sealing Elements
    Hydraulics
    Introduction to Hydraulics & Principles
    Hydraulic Systems & Applications
    Accumulators
    Filters
    Motors
    Pumps
    Valves
    Pneumatics
    Introduction to Pneumatics & Principles
    Pneumatic Systems & Applications
    Pneumatic Circuit Components
    Valves
    Cylinders
    Silencers
    Motors
    Compressors
    Dryers
    Conditioning Units
    Common Topics & Maintenance
    Hydraulic & Pneumatic Maintenance
    Study Notes, Exams & Tests
    Technical Drawing
    Introduction to Technical Drawing
    Geometric Drawings
    Perspective & Projection
    Orthographic Views
    Dimensioning
    Sectioning
    Assembly & Detail Drawings
    Tolerances
    Surface Finish Symbols
    Mechanical Engineering Drawing
    Screws, Bolts & Nuts
    Pulley Drawings
    Gear Drawings
    Shafts & Journals
    Bearing Drawings
    Pins & Bolts
    Spring Drawings
    Welds in Technical Drawing
    Washers
    Cotter Pins
    Technical Drawing Exercises
    Mechanical Drawing Exercises
    Gear Exercises
    View Extraction Exercises
    Pulley Exercises
    Pin & Bolt Exercises
    Threaded Fastening Exercises
    Descriptive Geometry
    Computer-Aided Drawing
    AutoCAD Drawing Lessons
    Solid Modeling & Animation
    Solid Model Drawing Files
    Solid Model Assembly Examples
    Solid Model Drawing Lessons
    3D CAD Software Reviews
    Solid Modeling Exercises
    CNC Programming
    CAM
    Measurement & Inspection
    Dial Indicators
    Calipers
    Gauges
    Micrometers
    Materials Science
    Steels
    Cast Iron
    Aluminum
    Plastics
    Material Testing & Hardness Measurement
    Occupational Safety
    Workshop Safety
    Safety When Working With Electricity
    Machine Safety Rules
    Hand Operations
    Filing
    Marking
    Cutting Operations
    Reaming
    Tapping
    Threading With a Die
    Drill Bit Sharpening
    Working With Machines
    Basic Turning Operations
    Basic Milling Operations
    Shaper Machine
    Machining
    Turning
    Milling
    Grinding
    Innovative Manufacturing Methods
    EDM (Electrical Discharge Machining)
    Laser Machining
    Waterjet Machining
    3D Printing
    3D Scanners
    Welding
    Rolling
    Casting
    Mold & Die Design
    Mechanical & Hydraulic Presses
    Blanking & Piercing Dies
    Bending Dies
    Drawing Dies
    Plastic Injection Molds
    Extrusion Dies
    Compound Dies
    Progressive Dies
    Blow Molds
    Spinning Dies
    Spray Molds
    Manufacturing of Machine Parts
    Automotive & Vehicle Technologies
    Motor Vehicle Manufacturing
    Raw Material Production
    History of Technology
    Health & Medical Technologies
    Defense & Aerospace
    Robotics Technologies
    Software & Hardware Technologies
    Mechanics - Strength of Materials
    Physics Topics
  • Technology & Life
    Hobbies & Entertainment
    Sports
    Music
    Vehicle & Engine Knowledge
    Vehicle Maintenance & Repair
    Safe Driving
    Driver Assistance Systems
    History
    Movies & TV Shows
    Books & Literature
    Computers & Internet
    Computer Tips
    Software Reviews
    Hardware & Peripherals
    Practical & Safe Internet Use
    Visual & Graphic Art
    Mobile Technologies
    Travel
    Science
    Health
    First Aid Knowledge
    Everyday Technologies
Makine Eğitimi
Home»Vehicle Maintenance & Repair»How to Jump-Start a Battery, Illustrated
29 August 2026

How to Jump-Start a Battery, Illustrated

How to Jump-Start a Battery, Illustrated

How to Start a Car With a Dead Battery

If your car’s battery is dead and the car won’t start, and there’s no other vehicle whose battery you can use, and your car has a manual transmission, you can try what’s called a “push start” (bump start). This action isn’t possible on automatic-transmission cars.

  • How to Start a Car With a Dead Battery
  • What Is a Jump Start?
  • How Is a Jump Start Done?
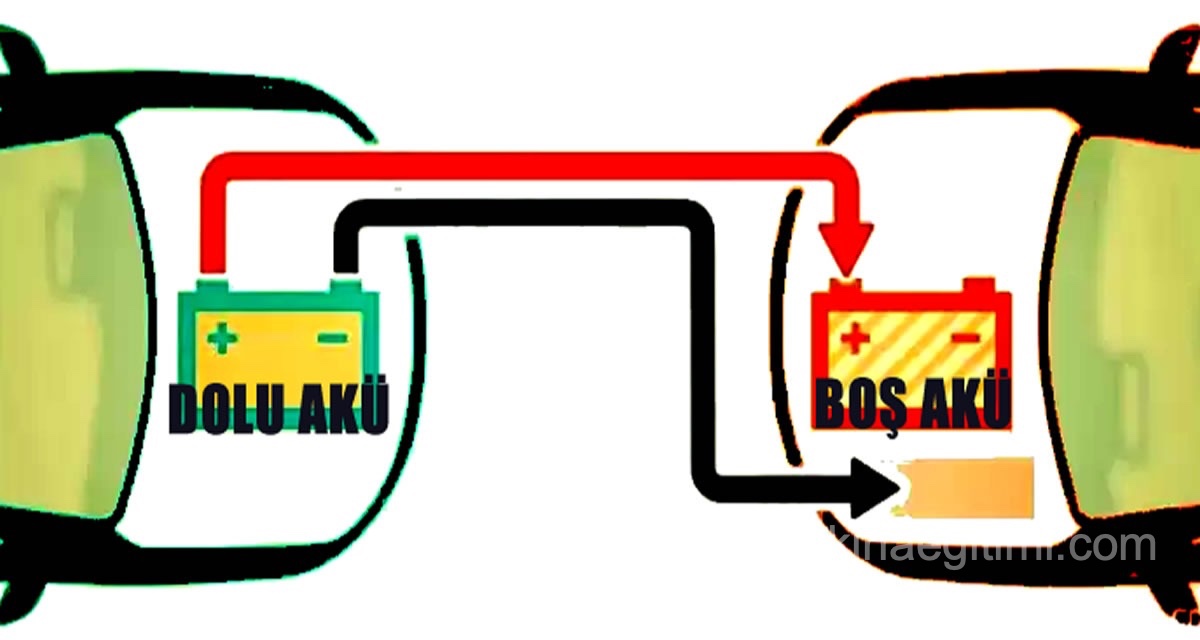
    • How Are Jumper Cables Connected?
    • What You Need to Know for a Proper Jump Start
  • Related Questions
push starting a car by pushing it

This means pushing a manual-transmission vehicle to get it moving, then suddenly releasing the clutch pedal a few times in 2nd gear. It’s used in difficult situations, but it’s a practice that can damage the car. It has the potential to damage the fuel injector, the timing belt, the catalytic converter, or the valves.

Correct Cable Connection Order


When jump-starting a battery, connect the positive terminals first, then the negative terminal on the working car, and finally the grounding point.

Short-Circuit Risk


Cables touching each other or the wrong terminals creates a serious risk of sparking and short-circuiting.

Same Voltage Requirement


The batteries of the two vehicles must have the same voltage (typically 12V) for a jump start.

What Is a Jump Start?

We can roughly describe a jump start as transferring charge from one battery to another. It’s a procedure done in urgent, important situations when your car’s battery runs down. The basic idea behind a jump start is that, by connecting another vehicle’s battery in parallel with your car’s battery, the donor battery essentially behaves as though it were your own car’s battery.

Jumper cables

You can jump-start a dead battery using another vehicle’s battery and a set of jumper cables.

A jump start is a procedure that needs to be done carefully.

An incorrectly performed jump start can cause faults in the electronic control unit (what we call the car’s “brain”) and various components — especially in fuel-injected cars — and result in a fairly hefty repair bill.

For those wondering, is a jump start harmful, let us note that a jump start done correctly will not harm your vehicle.

How Is a Jump Start Done?

  • Connect the red terminals, positive to positive.
  • Connect the black terminals from the chassis of the dead-battery car to the NEGATIVE terminal of the working-battery car
  • Start the other vehicle, let it idle for 10 minutes
  • Lightly rev the other vehicle to 2500-3000 rpm
  • Start your car. Let it run for about 5 minutes at 2000 rpm.
HOW TO JUMP-START A BATTERY

REMOVING THE JUMPER CABLES: Remove the black cable first, then the red one.

preparation for a jump start

To charge from battery to battery, first open both cars’ hoods. Locate the batteries and remove the plastic covers from the battery terminals.

jump-starting a car

There’s an important point to watch out for here.

The jumper cable and clamp. The red clamp always connects to the + terminal. (above)

How Are Jumper Cables Connected?

RED-TIPPED cable:
ONE END, to the Positive (+) terminal of the car with the working battery,
THE OTHER END, to the Positive (+) terminal of the car with the dead battery.

BLACK-TIPPED battery cable:
ONE END to any bare metal part of the dead-battery car’s body,
THE OTHER END, to the Negative (-) terminal of the car with the working battery.

WARNING: NEVER CONNECT THE (+) AND (-) TERMINALS TO EACH OTHER

how to connect jumper cables

Some people connect the cable to the negative (-) terminal of the dead battery as well, but this isn’t recommended, since it can sometimes cause sparking at the battery. It also isn’t necessary anyway — attaching it to any bare metal part of the dead-battery car completes the circuit just the same.

Make sure the cables don’t touch moving or hot parts such as the exhaust or the fan.

Then start the car with the working battery and let it idle for 8-10 minutes. (during this time, keep the ignition off on the dead-battery car)

After enough time has passed, lightly rev the car with the working battery to 2500-3000 rpm, and while doing so, turn the ignition on the dead-battery car. If you’ve waited long enough, the car will start. If it doesn’t start, turn off the ignition, wait a bit longer, and try again. Ultimately, how long you need to wait depends on the strength of the working battery.

After the dead-battery car’s engine starts, don’t immediately disconnect the jumper cables. Let the engine run for 5 minutes at 2000 rpm.

You can remove the cables from the dead-battery car first, then from the car you got the jump start from.

During this step, remove the negative (-) cable first, then the positive (+) cable.

What You Need to Know for a Proper Jump Start

To start the engine with a jump start, both batteries need to have the same voltage (12 V) and the same current rating (55Ah, 60Ah, 72Ah, etc.). (This information is printed on the battery)

what to do and what not to do for a proper jump start
The most important thing to watch out for during a jump start is not connecting the terminals the wrong way around.

Make sure the vehicle you’re getting the jump start from isn’t touching your vehicle. If the vehicles touch each other, an electric current forms across the vehicles as soon as the positive ends of the jumper cables are connected. This can create hazards.

When getting a jump start from another vehicle’s engine, you should turn off unnecessary lights and accessories in both vehicles.


In this article, we explained what to do when your car’s battery dies. We tried to cover, with plenty of pictures and details, how to jump-start a car from another car’s battery. We showed how the jumper cables are connected. We covered what to watch out for while jump-starting a battery. Looking forward to meeting you in future articles. We wish you good trips and accident-free driving.

Related Questions

A connection made in the wrong order or to the wrong terminals can create a serious spark, leading to a short circuit or even a battery explosion. The correct order minimizes this risk and makes the procedure safe.

This method carries a risk of damaging sensitive parts such as the fuel injector, timing belt, or valves. When it’s possible to jump-start the battery instead, the safer alternative should be preferred over this risky method.

Related Posts

Her Sürücünün Bilmesi Gereken 10 Temel Bilgi 10 Basic Things Every Driver Should Know How to Save Fuel in Vehicles How to Save Fuel in Vehicles How Is a Tire Changed? Changing a Vehicle Tire How Is a Tire Changed? Changing a Vehicle Tire Changing Spark Plugs. How Is a Spark Plug Change Done? Changing Spark Plugs. How Is a Spark Plug Change Done? How to Drive a Manual Transmission Car How to Drive a Manual Transmission Car How to repair a car rear window defroster - a fix for fogging How to Repair a Rear Window Defroster
Share. Facebook Twitter WhatsApp Tumblr Email Telegram Copy Link

Leave A Reply Cancel Reply

Traffic Regulatory Signs and Their Meanings. Restriction and Command Signs
Traffic Signs and Their Meanings. Warning Signs
  • Contact
  • Terms of Service
  • Privacy & Cookie Policy

Type above and press Enter to search. Press Esc to cancel.